Sunday, August 26, 2012

Deck nearly complete!


For all intents and purposes, it's a deck!

I want to add a ledge above the railing and am debating on how to do it. Here's your opportunity to vote on style! My three options are:
option 1 - no gap b/t ledge and railing
with post caps on 4x4s (36 inches)
option 2 - no gap b/t ledge and railing
with 4x4 cut flush (36 inches)
option 3 - gap b/t ledge and railing
(40 inches)
Leave your vote in the comments!


UPDATE (Aug 27): Option 1 wins based on comments here and Facebook! BTW- If you look closely in the picture above, the 3rd segment of the railing has a board on it that is how option 3 would look. Instead, I'll be notching boards to make the ledge and having my mom help me pick out post caps while she visits. Option 2 would have been the most difficult, so I'm glad that wasn't the preferred one =) Also, technically, recessed lighting could be done with any option, but due to limited electricity sources at the moment, it won't be happening any time soon.

Friday, August 24, 2012

Railing going up

I put the rest of the screws in the deck boards like I had planned and drained the battery of one drill halfway through the process. Luckily I had borrowed an extra corded one to complete the job. [Have I mentioned how much my friends rock? Maybe just a few times.] It wasn't quite dark when I finished that, so I decided to go ahead and tackle the railing. I knew I shouldn't need to cut the railing at all for the long side (18ft vs 12ft), so I started there. That involved putting up 3 of the pre-constructed railings. I started at the end closest to the house and lined up the bottom part of the railing with the edge of the 4x4 post. Then I needed to adjust the top part of the 4x4 to match. I only have 2 hands so I wedged my trusty ply-board scraps between the picket and the post.  I would put a screw into the railing part of the way and used my feet to push it flush with the 4x4. Since I had secured the bottom, I used my body weight to lean against the railing when I screwed in the top. On the other side of this railing, the top 2x4 wasn't completely straight and I couldn't just push it flush so I grabbed my vise anyway and fixed that problem. I have a new-found love for my vise, which was a hand-me-down gift.

Anyway today is my day off and I have a little time to get up the last 2 railings, so I'm going to go for it. Hopefully that will result in a new blog post today or tomorrow!

Wednesday, August 22, 2012

Toasting the deck!

The deck boards are down! Whitney came to help me with the last ones tonight and afterward we sat on the deck and had dinner and beer to toast it (reminiscent of toasting my kitchen completion) .


We were determined to finish placing those boards tonight. The thunder didn't stop us. The short-lived drizzle didn't stop us. We did it!


The last board needed some sawzalling (yes, I made that a verb) but we didn't encounter any impossibly warped boards. We made it all work and now it feels like a real deck!!! I could have table, chairs, a hammock, a grill and still have space for a dance party. Maybe I'm exaggerating, but it does look really large now that all of the boards are down. I still need to add some more screws (planned for tomorrow evening) and need to put on the railings (anyone want to help on Sunday?), but this milestone  is HUGE!

Tuesday, August 21, 2012

Monster Board!

The good news is that my deck boards are about 3/4 done!

Onto the challenge of the night...What I call, Monster Board! Whitney came over to help me put on deck boards and, per normal, there was a board that was bowed at the ends. It didn't look any more drastic than some of the ones that Rachel helped me put on over the weekend. We screwed in the first 3 joists and then decided to move to the end to get it in place. We pushed and tugged. Not close enough. We went back and screwed in the other boards to pull it closer, but no matter what we did it would not budge the last little amount we needed. Why was this board so difficult to move? Here's a look at the end of it

Our theory is that this board is from the dead center of a tree, which made it very strong. See how the rings are pretty symmetrical and the circle is right in the middle of the board. There is no cup or umbrella to be seen (see last post if this confuses you). We got it on though (keep reading for details)! The board is a little short, but so are the subsequent boards, so it doesn't look bad, and it's long enough for the screws to secure it well. Besides, as Whitney pointed out, you won't really be able to see that when the railings are up.

This blog post is also about how amazing my neighbors are! Whitney has been a great help on this deck throughout the whole building process. The neighbor whose backyard butts up to mine is also super cool. In addition to just being really nice and encouraging about the deck process (all of which he's had a great spot to witness) when Monster Board was refusing to budge and he happened to come outside with his dogs (one of whom loves to bark at other dogs, people... well, anything that moves) Rick came to our rescue when we asked for some help. He hopped the fence despite my dog trying to protect his territory by barking, jumping, and nipping (not to hurt, but to warn)... I should add, my dog normally LOVES Rick, and he got over his protectiveness quickly and apologized by pushing his head under Rick's hand. Anyway, we used my leg power AND his arm strength to get Monster Board in much better alignment. It was crazy, but my neighbors are the best. Oh, and Whitney is coming back to finish them tomorrow and Rick has offered to help again if we run into problem. See... The.Best. Period.

BTW - I may or may not be finishing this post on my laptop while on my deck (ok. I'll admit... I definitely am!)

Monday, August 20, 2012

Half of the deck boards are installed!

Thanks to Amanda and Rachel half of my deck boards are installed. Amanda helped me haul them outside last weekend. Rachel battled mosquitoes Friday night to start the deck board installation process and was willing to come back Saturday so that we could get to the halfway point! Let me remind you that halfway is 12ft x12ft. It's no small feat.
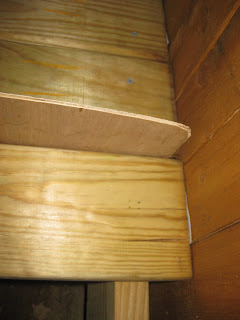
The first ones took a while because we were learning the best ways to space the boards and secure them so they would be straight. I had read that using a piece of plywood worked well as a spacer and we found that to be true! (see right)
Once we got our method down, the next boards took us considerably less time. I would wield the drills while Rachel would push the board into place with her feet (guys would probably use only a prybar, but I like our leg strength method too). We learned that it's better for the ends of the board to bow out because once one end is secure, it's much easier to push the boards at the end than in the middle.
My dad gave me the tip to make sure the grain of the wood at the cut ends look like an umbrella instead of a cup so that the boards don't "catch" water, but let it run off. (see below) Oooops, I didn't double-check all of them because a couple are flipped to cups (not to be confused with Flip Cup).
We also took my 2nd trip of the day to Home Depot to get more screws and drill bits. I found myself breaking bits (again) because the drill bit gets really hot, hits knots in the wood, is slightly twisted on the exit, was a longer bit than I needed, or some combination of reasons for me to break two of them in the 25 boards that we completed. Tip: Buy Extra Bits! I had gone early in the morning to Home Depot with Amy (big thanks shout-out to my neighbor) to get some more deck boards and the lattice to put along the sides so my dog wouldn't loose all of his toys under the deck. With 25 deck boards down he was risking that already, so the other part of my Saturday was spent cutting the lattice to shape so that I could block off the sides of the deck. I used both a hand saw and a circular saw to cut the lattice to size. 
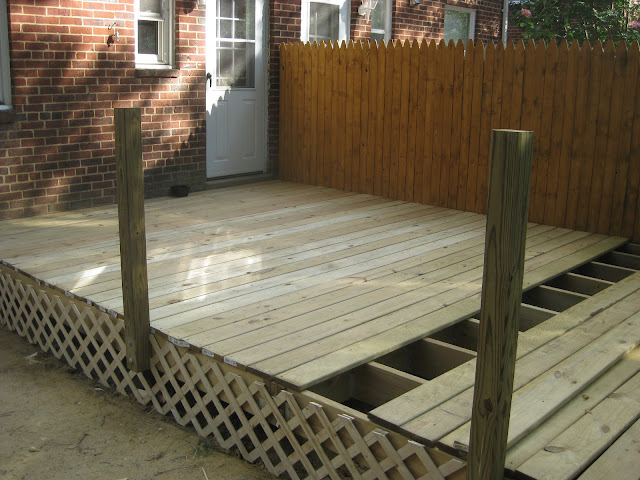
I did lots of measurements around the railing posts and dug some of the ground so that it would be slightly more level. I'm going to wait until all of the deck boards are down and I've trimmed them before securing the lattice with nails, but its temporary-state is enough to block an accidental flying dog toy. After they're nailed on, I'll put more dirt around the bottom to make them more resilient. Oh... and before Rachel came on Saturday, I installed toe kicks on the steps (see right). Since we had put 8 deck boards down on Friday, I had to crawl under them in order to get under the step closest to the house to screw the toe kick on from the inside. (For those of you who have no idea what I'm talking about, I'm referring to the piece of wood between and perpendicular to the ground and the actual step. After the step was installed and I went to take a step up, my foot slid under the step and I had added another nasty bruise to my shin. Tip: Put a toe kick on your step when you make it BEFORE you install it.) The step further from the house (in picture) was much simpler to do because the deck boards above it were not screwed on yet. In other words, I didn't have to crawl on the ground (well, on a tarp on the ground) in a 16 inches high by 16 inches wide space and maneuver under 2- 2x8s to install THAT toe kick. Threat of rain/storms halted work tonight, but here's its current state:

Sunday, August 12, 2012

Set back

I have successfully made more work for myself. I knew my deck would take a long time to complete so I opted to keep my deck boards on some blankets in my dining room until it was time to screw them to the frame. My intentions were to keep them from being exposed to a lot of weather before securing them in place. That may have helped them some, but turned out that some of the boards were damp. I had them stacked and the dampness seeped though the blankets. My poor floors.


I was planning to do some touch-ups on the dining room floor because my kitchen contractors weren't very careful and scratched it. This will force me to do it sooner. I'm thinking 4 or 5 layers of varnish this time.

Saturday, August 11, 2012

Wine Glass Holders (i.e. more cabinet space)

There was a lot of open space between my breakfast bar and the cabinet, so I decided to play up the "bar" part of "breakfast bar." It is the perfect amount of space for hanging wine glasses and still not block the view for face-to-face conversation with someone at the sink, which is very important... trust me. I found these racks at Lowes for about $3 each. For less than $20 I now have space for up to 18 wine glasses. Not that I have 18 wine glasses, but that's not the point.


It frees up space for me to store things in the cabinet that they are hanging from. If I get a chance/have inspriation, I can get more organizers to allow me to show off some of the nicer dishware that I have through the glass.

Tuesday, August 7, 2012

Whoa there, out-of-control-yard!

I was out of town for about 3 1/2 weeks and returned to a jungle. I spent my first evening back getting it under control. I probably used half a spool of weed-eater string getting my front and some of my backyard manageable. I also weeded and weeded and weeded. I'm so glad that I mulched my side yard! I still need to finish assessing my garden. I already know that my tomatoes need extra reinforcement and my lettuce has gone to seed, but I think there's also some veggie harvesting that needs to happen!


BTW - Shout out to my neighbors who watered my garden while I was gone and took care of the kitty!