Showing posts with label friends. Show all posts

Wednesday, December 28, 2016

"Made me think of you" gifts are the best gifts

My favorite gifts to give and receive are the ones that are not forced. When I see an item that makes me think of someone in particular, it's hard not to pick up. Bonus = when the item is on sale.
I was recently on the receiving end of an after-Christmas sale item that perfectly captured one part of my identity!
This is the new gift
This is also a gift, but one I've had for 6+ years
I immediately put it out to display, but it didn't seem quite right in that spot. While I was thinking about alternative locations, I also thought about what I wasn't getting to do this week as "dog mom." My mom, aka dog grandma, is watching him this week. [Sidenote - my house is lonely and I miss him.] One of the things I try to do regularly is take him for walks and jogs with his appropriately coordinated red leashes....💡💡💡💡 ←Brilliant idea forming here!

Hrmmmmm... a few hooks and thumbtacks would make my new gift a great decoration for an empty wall AND functional as a leash holder. Previously, his leashes lived on the floor next to the door or in a bag in the closet. A few screw hooks in the bottom, 2 thumbtacks in my wall, and a little help from my dremel resulted in this amazing addition to my living room. A thoughtful gift became a creative project for me. Wins all around!


Sunday, June 19, 2016

Repurposing ugly chandelier parts to make a new light fixture

Saturday was one of those unique days where I got to be creative AND handy.

My chandelier had been held up with painter's tape for almost 7 years so people wouldn't run into it in my tiny dining room. The chandelier was ugly and dated. I wanted to replace it for quite a while and recently took a stroll through the light section of Home Depot. I didn't see anything I liked. I knew I didn't want another chandelier because having a light hang low in such a small room didn't make much sense to me. The flush mount light fixtures were ok, but kind of boring. I figured I would keep working on other projects and eventually would make it over to Lowes to check their light stock. Until then, the ugly chandelier stays. However... as is often the case... my plans changed. One of my great friends, Kelli, was visiting me and suggested we take a trip to Habitat Restore to check for light fixtures. I had not been to the Restore since it moved 2 miles from my house, so I was long overdue to check it out. Plus I had some stuff to donate. It would be a win no matter what we found there. Well, I found inspiration!!!


On the left - ugly chandelier. On the right - you'll see the new light fixture that I created. I found the brown lamp shade for $5 at restore and thought, "I'm going to find a way to make this work." So, Kelli and I made a trip to Home Depot for the other supplies. I was hoping to find something already put together (ceiling mount, connectors, light bulb socket, wires), but that would be too easy. Instead, I came across the lamp-making section. I found a ceiling mount that I liked and from there it was like a puzzle to figure out what else I needed. I grabbed a package of zinc plated nipples (no, I'm not making that name up) and some sockets... and suspected I'd need to make at least one more trip to HD for this project (spoiler alert - I didn't!).

When I got home, I turned off the breaker to the dining room electricity and got started by removing the chandelier. I realized that this ugly chandelier may actually be useful... in pieces.

talk about a puzzle...

I disassembled the whole thing and realized that it had a nipple that wasn't entirely threaded (in other words, one that would look better). It also had some other pieces I could use... and I could save some $ by returning the unused ones pieces to HD. I took the wires out of the chandelier, scavenged some of the connectors, and began reassembling.


I attached the socket to the nipple that I got from the chandelier and threaded the wires though both. Using wire cutters, I stripped the ends of the wire to reveal fresh copper and I twisted ends. I attached the exposed copper pieces to the socket screws and slid the lamp shade over it all. Then I had to attach it to the ceiling mount. I ended up taking the bracket on and off a couple of times because after I put it up, I realized it would be easier to attach the nipple to the bracket before screwing the bracket into the electrical box, but eventually got everything situated.

I'd like to say it that was the end of the installation, but this morning Kelli and I both realized it would look better if it were slightly lower. I pretty much took it all apart, added more connectors from the old chandelier, and reassembled. Now it spreads out the light more and gives a better view of the ceiling mount... but it is not too low to knock most people in the head. My unusually tall brother may graze the bottom because it's now 6'7 from the floor, but he's used to ducking lights, so I'm not worried.


I may get a brighter light bulb for it at some point, but for now it's great!
I suppose I will have to take another trip to HD to return the unused nipples and extra socket, but I don't count that as an extra trip for this project because the returns aren't necessary for completing the project. Especially because I'll be back over there soon enough for my next project, I'm sure. Once I return the items, this project will have only cost me around $16!

Sidenote... at Restore I found some "retrofit recessed lights" that came with LED bulbs. I ended up getting 5 LED bulbs for $14 and I may be able to used the recessed light pieces in my basement eventually. SCORE!

Monday, September 7, 2015

Installing Baseboards

I had a dilemma... Do I leave my furniture in the middle of the room or move it all back to reasonable locations? I have baseboards!!! They look great and it's a shame that they are so hidden. Yes, that means I decided to move my furniture back.

I used the long weekend to tackle baseboard installation on the main level of my house and they are all installed! For many, many months they had all been painted, but taking up space in my dining and living room. I installed them in my bedroom earlier in the year and forgot I hadn't blogged about it, so here it goes. My bedroom was a good starter room. The baseboards in my bedroom consisted of one baseboard per wall with inner corner cuts. Four walls. Regular corners (no odd angles). Two doorways. Not too difficult.

Then, there's my downstairs where the living room, dining room, and kitchen all connect without doors, lots of inner and outer corners, and one length of wall that would need 2 pieces of baseboard and 3 pieces of shoe moulding. Let's not forget the flooring transition between the dining room and kitchen because the flooring is not level. This is a picture of the transition (and my cat) and the baseboard with a sketch of the porton that needed to be removed in order for the baseboard to fit around the transition.
 
I don't have a jigsaw so I used a hacksaw, dremel, and my miter saw to make the cut at the bottom of the baseboard so it would fit around the transition. It wasn't perfect, but the imperfect cut would be hidden by the shoe moulding. However, the angles for the shoe moulding were also fairly impossible. My tool that measures the angles doesn't work well with small segments, so I had to recreate the angle with two pieces of paper and then could line up the tool with the paper edges to figure out the angle. For instance, the angle for one transition was around 165 so each piece needed to be at a 82.5 degree angle. I set the miter saw at 7.5 degrees and had to figure out the directions to cut each of those little pieces. Plus, one side needed to have an outer angle cut to fit around the wall (45 degree angle with the moulding positioned a different way). And the other piece needed some sort of angle to fit with the shoe moulding along the dining room floor... but the floor transition doesn't angle all the way to the floor. Of course, there's a slight lip to make it just a little more difficult. 

I didn't stress about it too much though. I did the best I could and used some spackle to make it smooth. I'm pretty pleased with the results. I did fill in the nail holes with spackle, but eventually I'll need to add some caulk and do touch-up paint.

Even though I did my baseboards on my own this weekend. I have to thank Kelli who helped me measure, cut, and install baseboards in my bedroom. She was WAY more helpful than the cat, who was particularly good at photo-bombing. The cat wanted to be in my picture of some of the tools I used for this process. That's a lot of tools. My dining room was the staging room and there were tight quarters, but I made it work.


Warning- the air compressor can get really HOT. I accidentally bumped it with my shoulder and have a little burn mark. Otherwise, I was careful with my power tools and was unscathed.(The yardwork I did this morning was another matter, but that's off topic).

This picture should also have included the tissue box that I used to keep the baseboards level with the miter saw while making the cuts. It served dual purposes because the saw dust also made me sneeze some. :)

Don't they look good?

Sunday, November 2, 2014

Brightening up my home

I've had "installing doors" on the to-do list for a LONG time. I forgot to take pictures of the old ones but there's an example of the dated and unattractive doors in this old post. Somewhere I probably have pictures of the door frames that were in horrible shape, but I couldn't find them so I'll explain one of the problems. At some point before I moved in, the screws for the hinges had stripped the wood in the frames. Instead of replacing or even repairing the frames, they flipped the door and screwed the hinges into different places in the same frames. You could see the damaged areas of the frames... plus the frames had a ton of coats of paint on them (the house is 60 years old after all). I've been living with upside-down doors since I moved into my house... until now.
Today, I finished installing the brighter, white doors upstairs. I did the small closet door on my own a while ago, but had help from my brother and neighbor securing the two bedroom and the bathroom doors. Some of the installation was trial and error (story of my home repairs!) so here's what I learned.

First, secure the door knob side of door at top with shims.
Secondly, nail in frame with 2 or 3 nails on each side making sure the frame lines up with the drywall.
Then, shim the hinge side of door making sure it's plumb.
Shim the door knob side of door.
Finally, check the door closure and adjust as needed.


I did some of these steps out of order with one of the installations and it took way longer than it should have. I saved myself a lot of time and frustration installing the last two doors this weekend because I had typed up those steps. It wasn't frustration-free though because I did bend a few nails and smashed my thumb once (I have a nice fever blister to prove it). I need to pay more attention when I'm hammering and take breaks when I get tired. In my defense, twice the nails got caught in knots in the wood so they were going to bend regardless of one's skill.
.
These doors look much better than the old ones and the bathroom even seems bigger with the white door. Next up, adding the casing. I was hoping to do that for some of the doors today, but am missing a tool that will make it much easier. Instead I filled in the nail holes with spackle and did a few other touch-up things. Guess I'll make another trip to a hardware store (story of my home repair life!) so I can add casing next weekend. If I'm super productive I may even paint everything a real white instead of just leaving them primed. I suspect that will be a project for a later weekend though.

Not that the doors aren't nice to look at, I'll leave you with these prettier flowers that I bought to brighten up my downstairs. Thanks for checking out my house progress after such a long delay between my posts! I have done more work in my yard and stained a lot of fence panels recently, but didn't have any big tips to share with those project.

Monday, July 28, 2014

Fixed with wood filler!

Wood filler smells horrible, but it fixed the problem! I was able to fill in the old location of the strike plate and it was really solid when it dried. In the left picture below you can see where I used the wood filler. When it was dry I sanded it down and used a little spackling paste to make it smooth (goes on pink and dries white in the middle picture). I let it all cure overnight and used my drill 1/2 inch boring bit to make the initial hole about an inch above the old spot and then used my dremel to make straighter edges for the strike plate. I also used my drill to pre-drill holes for the screws and voila! The door closes!
A fresh coat of paint and trim will complete this project. Huge thanks to Joanna for suggesting using wood filler based on her father's experience installing a new door.


Wednesday, June 18, 2014

Scary Story Time

It was a dark and stormy night when my phone rang. My friend was scared AND was home alone......... water was pouring into the home office that contains a lot of filming and electronic equipment. Ok,  not the horror flick plot you may have envisioned at first, but this is very scary for a home owner! Not only can water ruin the stuff inside our homes, but it can cause damage and mildew and mold (oh my).
First things first, the water needed to be diverted until the rain stopped. Based on her description of where the water was leaking I suspected the exterior sill was the problem and advised her to dry any pooling water on the sill as best as possible and to put a waterproof, malleable plastic something or other in the window draping over the side of the house. She suggested trash bags, which was a perfect solution! Add a little duct tape and no water was going to touch that sill. It worked for the next couple of days of storms. She sopped up as much water from the carpet as she could with towels and kept fans oscillating on that area for days too.

The day after the phone call I was able to bring another fan for carpet drying and assess the window situation. A crack between the bricks and the mortar seemed to be the issue. It would also explain why there had to be downpours and pooling water on the sill for it to come inside the house, since the leaks didn't happen every time it rained. Luckily they have plaster walls which are mold resistant, so that's one less thing to worry about, and overall the damage wasn't bad. It still needed to be fixed because a trash bag barrier isn't the classiest.

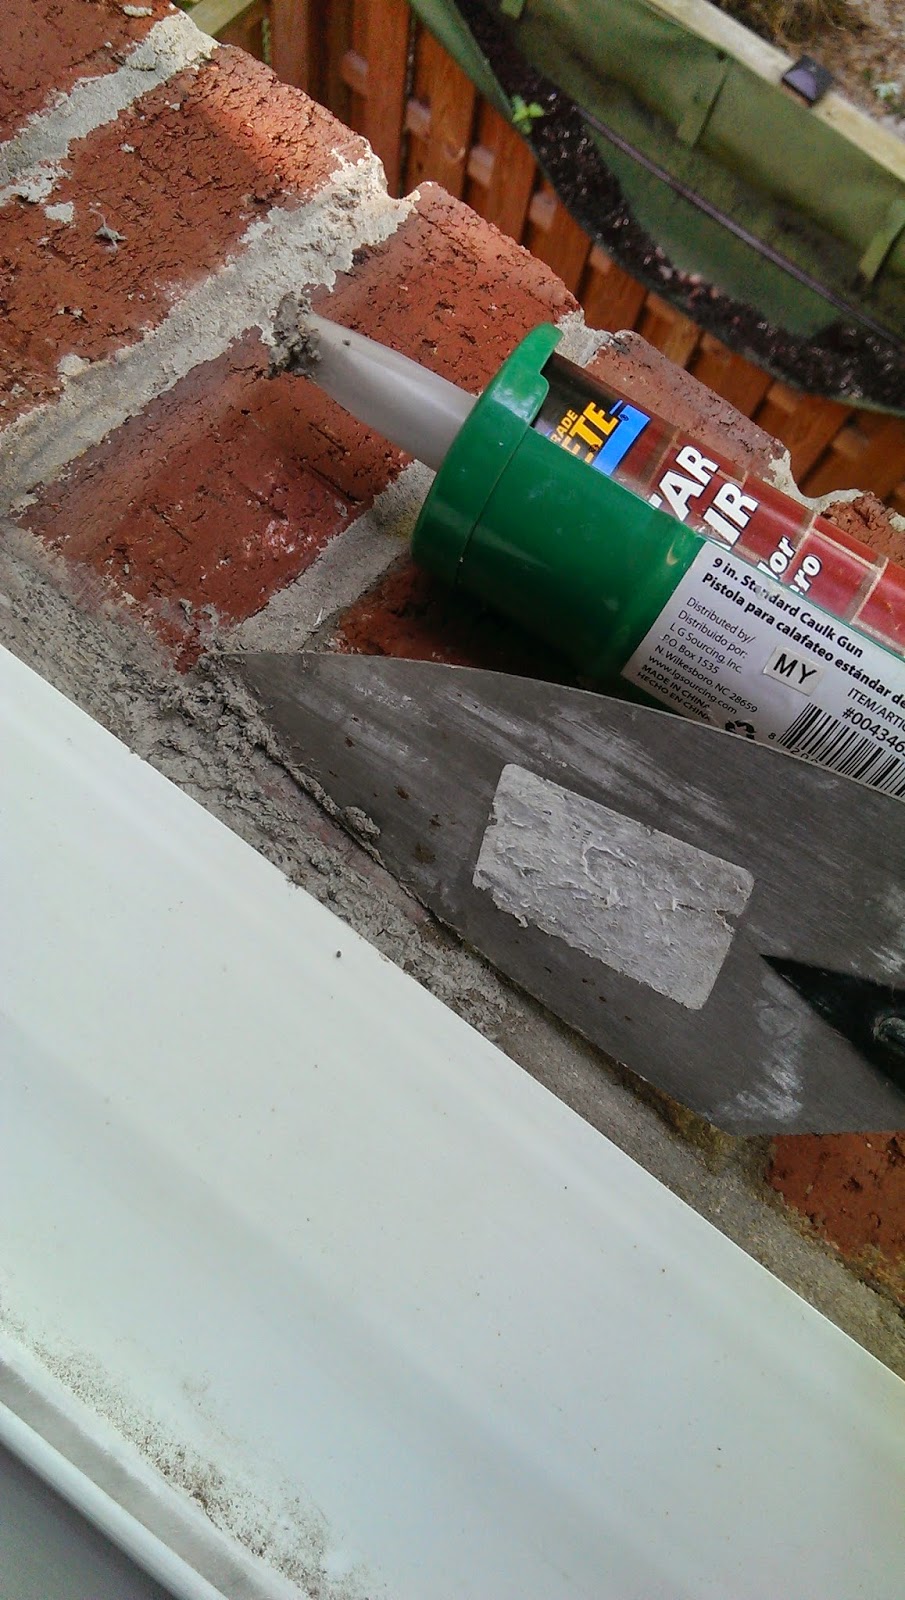
I happened to be at a Lowes two days later so I picked up some Quikrete Mortar Repair. I already had a trowel from my deck building project and a caulk gun. The weather seemed to be cooperative the next two days with no predicted rain, so the next morning I set to repairing that crack. First I needed to clean it and make sure it was dry. My fan set-up may have been overkill, but I wanted to be sure it was dry after all of the rain we had!

Next up, applying the mortar and smoothing it out. The mortar repair canister actually has a little lip on the end to help get the new mortar into the crack and smooth, but I was glad I had the trowel too. It really helped to make it more even. I probably spent twice as long as I needed to on it, but I feel good about the results. So far there haven't been any more downpours to test it (which means it should be good and "cured" at this point), but crossing fingers that it solves the problem! The before-and-after picture below makes me hopeful that it will!


Monday, March 17, 2014

"The Hammer's just so hype"

On the way out of my house:
    Me:     I need to hammer that in [pointing to the hinge pin in my front door].
    Visitor: I think I have a hammer in my car.
    Me:     Oh, I have one in my basement. I just need to remember to do it.
    Visitor: Of course you do... I bet your hammers have hammers.

Although it was a joke... it's not so far off.


However, my hammers don't have hammer pants!

Shhhhh, don't tell I own 2 prybars.

Tuesday, November 5, 2013

New shelf for a complete look

I was inspired by the original subway tiles to do a black and white bathroom. Besides, the towels and shower curtain can easily add color to a bathroom. I figured that a black and white bathroom could also be helpful for resale value of the house (says the girl who painted other parts of the house orange haha). My pop of color is purple in the towels. However, I got a black and white shower curtain, so I needed to incorporate my accent color elsewhere. The spot that needed color the most was on the right side of the bathroom, but I didn't want to just have purple stuff sitting on the top of the toilet tank either. I decided to add a shelf that would withstand the weight of a purple diffuser and a purple beta fish (and container)!

I found fun swirly "scroll" brackets and was given a nice board that friends were getting rid of to cut for the shelf. [Sidenote: They had used the boards as part of a TV stand but got a cool electric fireplace TV stand as a replacement... and it's really cool!] Some paint, measuring, drywall anchors, and drilling later, here are the results.


My purple beta fish was added on Saturday! I'll call him CG for "cutest grape" because this commercial makes me smile.


I found a purple glass container to use as a reed diffuser, so my bathroom is vanilla scented.

\
The black and white sheer handkerchief holds my assortment of earrings

Before
After

Monday, January 7, 2013

New Railing


The first few steps of stairwell had been lacking a railing since the first week of owning the home. The original railing had a ton of coats of peeling paint and was very boring, so I removed it during floor refinishing (don't worry... the rest of the steps have been safer since Oct 2010). Although convenient not to have a railing for move-in and taking larger items upstairs for projects, I have friends with mobile kids, which makes having a railing more necessary. I took multiple trips to the hardware stores just to scope out the supplies. I quickly came to the determination that I did not like any of the newel posts available at the hardware stores, but I found one I really liked on ebay from a Canadian wood carver. After a couple of messages back and forth I determined what I wanted to get, which included a half newel post too and made the purchase. It was also cheaper than the ones in the hardware stores near me. It took a couple of weeks for the pieces to arrive, so in the meantime I bought the balusters and railing from the local hardware store. I found a really handy video describing how to install a railing. If you don't want to watch the whole video here is one tip I learned: you should count the number of steps that the railing will span and add 1 for the number of feet you need for your railing.

This project was one of the harder ones I've had to do b/c I had to notch the bottom post to fit the corner of the step. Also the pieces are pretty expensive, so it makes that "final cut" all the more stressful. But it turned out great! Kelli and Whitney were my extra hands for this project. They also listened to me "talk it out" when I was thinking about angles and cuts and helped me out with trips to the hardware store. I couldn't have done it without them... and my trusty mitre saw. Some other things to note. I wasn't too confident that the liquid nails was going to work on the balusters, but after 48 hours of curing, those things aren't going anywhere.

The railing has been usable since November, but I still have a couple of finishing touches (i.e. another coat of sealant on it because I missed some spots due to my dark basement not providing enough light). The holidays were approaching and I decided to give myself a break from house projects, but will probably get to it soon.

It's way better than the original AND the top of the newel post is similar to post caps on my deck. I figure if I'm redoing so much of the house, it should tie together.


Monday, November 26, 2012

From brass to satin nickel hardware!

My fabulous friend Kelli has done another guest blog post! She'll also be featured in my next post. Feel free to share congratulations with her for these improvements in the comments.

When I purchased my house almost two years ago, the previous owners had upgraded some great things in the house - I had new stainless steel appliances, shiny and satin nickel light fixtures, and new sink faucets which were a shiny nickel. However, these didn't match the brass hardware on the door knobs, locks (exterior doors), and door hinges. To be honest, it didn't bother me that it was mismatched - as long as it worked, that was all I really cared about. I definitely liked the newer silver stuff and put it in my long term plan to update the hardware.


In September, I was hanging out with a co-worker of mine who was in the process of selling her house (about a mile from mine!) and she showed me how easy it was to update the hardware. She also had brass hardware in her house when she bought it, and she was putting the money in now in the hopes that the house would sell faster. She also put in bamboo floors in the kitchen and living areas and new appliances in the kitchen, which is very similar to what my previous owners had done.
I was really impressed with how easy it looked to update the hardware, and she told me she had spent about $500 for her whole house, which was a little smaller than mine. I figured if she can do it, so can I! I got a coupon in the mail that week for discounts on total purchases at Lowe's (which I can walk to from my house) so I figured I might as well take a crack at changing out the hardware. I thought the door hinges would be hard to do because I would have to take off the door and re hang it, but I didn't! My coworker showed me how to switch out each one, and how to remove the pins when she needed to put a door stop at the top (see picture on right). She was using a battery operated screwdriver to do all the hard work. I only have a corded drill, which is quite a bit heavier than the screwdriver. Unlike my coworker, I opted to get slight fancier handles for the doors in my house (see picture below). I did this for two reasons - one, I wanted to enjoy them and I liked them better, and two, they are more accessible for people who have arthritis or have a hard time gripping a handle. I figured anything I can do to make my home more accessible is a good thing!
This is a bathroom/bedroom handle with lock 

I took about 5 trips to Lowe's over a month to get the interior handles and doors done. I took notes about what I had so far (and did some measuring) and added up how many doors I have! I bought just enough supplies to do a few doors at first to make sure I liked the style and could really do it. I switched out two closet doors on my first floor, and ended up installing one of the handles backwards (I fixed it later once I figured this out!). I also bought all the hinges in bulk because I got a lower price (contractor's price) per unit. What's odd is that Lowe's and Home Depot both sell packs of three door hinges, but it was more expensive than buying the individual hinges without the contractor's price, so be sure to do some price comparisons! I also looked online but found my nearby Lowe's to have a competitive price.
strike plate

The handles didn't come with many instructions so it was a bit of trial and error. It took me until the third door for me to realize that the allen wrench which came with each new knob was for removing the handle and switch it around if needed, since not all door handles face the same direction. The hardest ones were the static handles because I had to re-drill the holes where these handles went into my pantry doors and one bedroom closet. Otherwise, the door handles were very easy once I got the hang of it! Not only did I have to replace 3 hinges on each door and the handle itself, I also had to replace the piece in the door frame (aka strike plate).  I put in three different types of handles - ones for the bedroom/bath which have a lock on them, for the closets which do not have a lock on them, and static ones which do not need to turn. I still haven't replaced the exterior door locks because they are a little pricier and involve having to switch out the key cores or re-coring them - I'm not sure yet! Maybe a future blog post!
Brass exterior door handle and bolt to be replaced

Sunday, October 21, 2012

Guest blog post: Installing hardwood floors!


Guest blogger Steve shows off the amazing transformation in his house!


Finally!  It took a couple of years to get to it (very un-breaking nails-like), but I finally got the hardwood floors installed on the main level of my house in September.  The new floor is a huge upgrade from what I had before.  I bought the house with carpet so I had no idea what I was getting into when I removed the carpet.  Water damage on the main level with just a hint of termite damage to go with it.  Exciting, right?  Well after living with it long enough, I took some time off from the job to work on the floor.  Is there a better way to spend a stay-cation?  After two weeks of work (and a couple of weekends afterwards), I got the job done.  What an improvement!  But I can’t rest, there’s still the upstairs to do so that promises even more fun.

Improve on, breaking nailers!

Thursday, September 20, 2012

Deck Party Success!

I got my final building permit approval the day before my deck party/cookout. I finally have space to host a lot of people. I wanted to celebrate the many people who have helped me with house projects, those who have been supportive of the process, those who lend me tools, my birthday, and the milestone of building a deck. We had lots of food, including tons of cookies! I may have been on a baking frenzy. I had some self-rising flour I needed to use (or it wouldn't be self rising any longer) so I made some sugar cookies and it just spiraled from there... milk chocolate chip, toffee & milk chocolate chip, zucchini with craisins & coconut & chocolate chip. At least 60 people came throughout the day and all (adults, kids, and dogs) seemed to be having a good time! This cutie even got to use scrap wood as building blocks.


Wednesday, August 22, 2012

Toasting the deck!

The deck boards are down! Whitney came to help me with the last ones tonight and afterward we sat on the deck and had dinner and beer to toast it (reminiscent of toasting my kitchen completion) .


We were determined to finish placing those boards tonight. The thunder didn't stop us. The short-lived drizzle didn't stop us. We did it!


The last board needed some sawzalling (yes, I made that a verb) but we didn't encounter any impossibly warped boards. We made it all work and now it feels like a real deck!!! I could have table, chairs, a hammock, a grill and still have space for a dance party. Maybe I'm exaggerating, but it does look really large now that all of the boards are down. I still need to add some more screws (planned for tomorrow evening) and need to put on the railings (anyone want to help on Sunday?), but this milestone  is HUGE!

Tuesday, August 21, 2012

Monster Board!

The good news is that my deck boards are about 3/4 done!

Onto the challenge of the night...What I call, Monster Board! Whitney came over to help me put on deck boards and, per normal, there was a board that was bowed at the ends. It didn't look any more drastic than some of the ones that Rachel helped me put on over the weekend. We screwed in the first 3 joists and then decided to move to the end to get it in place. We pushed and tugged. Not close enough. We went back and screwed in the other boards to pull it closer, but no matter what we did it would not budge the last little amount we needed. Why was this board so difficult to move? Here's a look at the end of it

Our theory is that this board is from the dead center of a tree, which made it very strong. See how the rings are pretty symmetrical and the circle is right in the middle of the board. There is no cup or umbrella to be seen (see last post if this confuses you). We got it on though (keep reading for details)! The board is a little short, but so are the subsequent boards, so it doesn't look bad, and it's long enough for the screws to secure it well. Besides, as Whitney pointed out, you won't really be able to see that when the railings are up.

This blog post is also about how amazing my neighbors are! Whitney has been a great help on this deck throughout the whole building process. The neighbor whose backyard butts up to mine is also super cool. In addition to just being really nice and encouraging about the deck process (all of which he's had a great spot to witness) when Monster Board was refusing to budge and he happened to come outside with his dogs (one of whom loves to bark at other dogs, people... well, anything that moves) Rick came to our rescue when we asked for some help. He hopped the fence despite my dog trying to protect his territory by barking, jumping, and nipping (not to hurt, but to warn)... I should add, my dog normally LOVES Rick, and he got over his protectiveness quickly and apologized by pushing his head under Rick's hand. Anyway, we used my leg power AND his arm strength to get Monster Board in much better alignment. It was crazy, but my neighbors are the best. Oh, and Whitney is coming back to finish them tomorrow and Rick has offered to help again if we run into problem. See... The.Best. Period.

BTW - I may or may not be finishing this post on my laptop while on my deck (ok. I'll admit... I definitely am!)