
Monday, October 12, 2015
Monday, September 7, 2015
Installing Baseboards
I had a dilemma... Do I leave my furniture in the middle of the room or move it all back to reasonable locations? I have baseboards!!! They look great and it's a shame that they are so hidden. Yes, that means I decided to move my furniture back.
I used the long weekend to tackle baseboard installation on the main level of my house and they are all installed! For many, many months they had all been painted, but taking up space in my dining and living room. I installed them in my bedroom earlier in the year and forgot I hadn't blogged about it, so here it goes. My bedroom was a good starter room. The baseboards in my bedroom consisted of one baseboard per wall with inner corner cuts. Four walls. Regular corners (no odd angles). Two doorways. Not too difficult.
Then, there's my downstairs where the living room, dining room, and kitchen all connect without doors, lots of inner and outer corners, and one length of wall that would need 2 pieces of baseboard and 3 pieces of shoe moulding. Let's not forget the flooring transition between the dining room and kitchen because the flooring is not level. This is a picture of the transition (and my cat) and the baseboard with a sketch of the porton that needed to be removed in order for the baseboard to fit around the transition.

I don't have a jigsaw so I used a hacksaw, dremel, and my miter saw to make the cut at the bottom of the baseboard so it would fit around the transition. It wasn't perfect, but the imperfect cut would be hidden by the shoe moulding. However, the angles for the shoe moulding were also fairly impossible. My tool that measures the angles doesn't work well with small segments, so I had to recreate the angle with two pieces of paper and then could line up the tool with the paper edges to figure out the angle. For instance, the angle for one transition was around 165 so each piece needed to be at a 82.5 degree angle. I set the miter saw at 7.5 degrees and had to figure out the directions to cut each of those little pieces. Plus, one side needed to have an outer angle cut to fit around the wall (45 degree angle with the moulding positioned a different way). And the other piece needed some sort of angle to fit with the shoe moulding along the dining room floor... but the floor transition doesn't angle all the way to the floor. Of course, there's a slight lip to make it just a little more difficult.

I didn't stress about it too much though. I did the best I could and used some spackle to make it smooth. I'm pretty pleased with the results. I did fill in the nail holes with spackle, but eventually I'll need to add some caulk and do touch-up paint.
Even though I did my baseboards on my own this weekend. I have to thank Kelli who helped me measure, cut, and install baseboards in my bedroom. She was WAY more helpful than the cat, who was particularly good at photo-bombing. The cat wanted to be in my picture of some of the tools I used for this process. That's a lot of tools. My dining room was the staging room and there were tight quarters, but I made it work.

Warning- the air compressor can get really HOT. I accidentally bumped it with my shoulder and have a little burn mark. Otherwise, I was careful with my power tools and was unscathed.(The yardwork I did this morning was another matter, but that's off topic).
This picture should also have included the tissue box that I used to keep the baseboards level with the miter saw while making the cuts. It served dual purposes because the saw dust also made me sneeze some. :)
Don't they look good?


Wednesday, April 1, 2015
Removing Baseboards
I've had a draft of this post written for a very long time. Now that I'm finally installing new baseboards, I figured I should let you know how I removed the old ones.
I'm pretty sure that the baseboards were original to the house and were pretty beat up. I was convinces they had to go... plus it helped with the floor refinishing process. I bought myself a pry bar and a good hammer and started at it. It was also good that I did this before I painted so I wouldn't mess up a new paint job. The quick and dirty description of how to remove a baseboard is: put edge of pry bar at the top of the baseboard, hammer pry bar behind baseboard, gently pry baseboard away from wall slightly (can be less than 1/2 inch), move pry bar further along the baseboard, and repeat until full baseboard is slightly away from wall, then work your way back to get it even further away from wall until you can pull whole thing out with out damaging the wall. If you try to remove the whole nail before prying the full baseboard slightly away from the wall, you risk damaging the wall behind it.
 I ended up some nails left in the walls that I am having to remove now that I'm installing the new baseboards. Some of those need a little engineering ingenuity (in fact, I was told I should have been an engineer when someone saw my methods, but I'll stick with my current profession). Sometimes I've had to use a block for leverage with the hammer or pry bar (I'm pretty certain I learned that trick from Dad). I've also used interesting configurations of the hammer and pry bar to get nails out. Occasionally I've been able to use needle nose pliers to pull the nail out. If all else fails I hammer it all the way into the wall or saw it off with a small hacksaw right at the wall because it's just going to get covered by a new baseboard. I just have to be careful not to shoot a new nail into the old one. Before I install more baseboards, I'll make sure to survey old nail holes and will put a piece of painter's tape on the wall right above the nail to be careful around that spot.


I'm pretty sure that the baseboards were original to the house and were pretty beat up. I was convinces they had to go... plus it helped with the floor refinishing process. I bought myself a pry bar and a good hammer and started at it. It was also good that I did this before I painted so I wouldn't mess up a new paint job. The quick and dirty description of how to remove a baseboard is: put edge of pry bar at the top of the baseboard, hammer pry bar behind baseboard, gently pry baseboard away from wall slightly (can be less than 1/2 inch), move pry bar further along the baseboard, and repeat until full baseboard is slightly away from wall, then work your way back to get it even further away from wall until you can pull whole thing out with out damaging the wall. If you try to remove the whole nail before prying the full baseboard slightly away from the wall, you risk damaging the wall behind it.
I ended up some nails left in the walls that I am having to remove now that I'm installing the new baseboards. Some of those need a little engineering ingenuity (in fact, I was told I should have been an engineer when someone saw my methods, but I'll stick with my current profession). Sometimes I've had to use a block for leverage with the hammer or pry bar (I'm pretty certain I learned that trick from Dad). I've also used interesting configurations of the hammer and pry bar to get nails out. Occasionally I've been able to use needle nose pliers to pull the nail out. If all else fails I hammer it all the way into the wall or saw it off with a small hacksaw right at the wall because it's just going to get covered by a new baseboard. I just have to be careful not to shoot a new nail into the old one. Before I install more baseboards, I'll make sure to survey old nail holes and will put a piece of painter's tape on the wall right above the nail to be careful around that spot.
SHARK BITE! The DIY, affordable way to fix copper pipes.
Apparently I'm not the only one who drills into water pipes! Thanks to a blog reader/friend, I've learned of how to fix holes in copper pipes the easy way... no soldering necessary. I'm still glad I saw what the plumber did because I would have made much more of a mess and probably would have been second-guessing myself the whole time. Here's what to do.
For humility's sake, let's put up an image of the pipe again. Yep... hole right in the middle. I did that.

If this happens to you, here is what to do...
1) Sprint to turn off the water main! (hopefully you are reading this BEFORE drilling into a pipe because if you are googling "how to fix a copper pipe" and your water main is still on, then you are going to need professional help).
2) Clean up the mess and put a towel under the pipe where the hole is.
3) Drain your system by turning on your hot and cold water faucets in the bathrooms especially in the lowest level of your house.
4) Get a pipe cutter, deburr/depth gauge tool, and shark bite push-fit coupling from your local hardware store.
5) Cut the pipe on either side of the hole no more than 2 inches long. Be patient with cutting the pipe. It may take a while.
6) This short video shows you the rest of the steps. And dude had an accent so that's extra reason to watch.
I hope this saves someone $200+ in their next plumbing emergency!
For humility's sake, let's put up an image of the pipe again. Yep... hole right in the middle. I did that.
If this happens to you, here is what to do...
1) Sprint to turn off the water main! (hopefully you are reading this BEFORE drilling into a pipe because if you are googling "how to fix a copper pipe" and your water main is still on, then you are going to need professional help).
2) Clean up the mess and put a towel under the pipe where the hole is.
3) Drain your system by turning on your hot and cold water faucets in the bathrooms especially in the lowest level of your house.
4) Get a pipe cutter, deburr/depth gauge tool, and shark bite push-fit coupling from your local hardware store.
5) Cut the pipe on either side of the hole no more than 2 inches long. Be patient with cutting the pipe. It may take a while.
6) This short video shows you the rest of the steps. And dude had an accent so that's extra reason to watch.
I hope this saves someone $200+ in their next plumbing emergency!
Saturday, March 21, 2015
Dumb Dumb Dumb (aka Uncharacteristic Carelessness)
Biggest home repair fail yet...
Context first - I have been meaning to repair this poor drywall installation/missing drywall in my spare room for a while. I decided to take a stab at it this weekend while the room was vacated. The primary motivation is to make sure there is drywall along the bottom of the wall so I can install baseboards. [I've already installed baseboards in my room, but will have to blog about that later.]


After measuring for the new drywall piece, I got to cutting. Luckily, one of my coworkers had some extra drywall that he gifted to me (Thanks, Doug!), so I had a full piece of drywall to work with. All of the scraps I had around were shorter than the 54ish inches that I needed.

I also needed to cut out a hole for the electrical socket, so my utility knife got a lot of use. So far so good. I started to screw it in and it fit! I was a little nervous about that because of the added pipe insulation. Just a few more screws and then I'd be ready for the hard part... drywall tape and mudding. And then I did something really really stupid.
I drilled right into a pipe... yep, I could hear water spewing. However, at first it sounded like air, so removed the screw and water went everywhere. You should have seen how fast I darted down 2 flights of stairs to my water main to turn it off!
The worst part is I even had a gut instinct right before that screw that told me "check the pictures you took of inside of the wall"... but did I? No. I didn't. Like I said... really really stupid.
I called Roto-Rooter for some emergency plumbing and Lee came to fix it for me for $250. He also showed me how to fix a section of pipe while he was doing it and we were chatting. [Guess who needs a pipe cutter and solder! :)] He was really entertaining. I learned all about his family and a ton about his past history. He made the experience so much better. He could have said, "you should have called someone else to do this type of work," but instead he was very encouraging about all of the work I put into the house. He said homeowners need to know a lot more about their homes so they don't get "taken" (and proceeded to tell me a long story about a horrible contractor and a nice elderly woman). He applauded my independence. His parting words were "Miss Laura, keep on drilling" to which I replied "...in the right places."
Sometimes DIY isn't easier on the wallet, but it's humbling and character-building, right? Maybe I'll even learn to listen to my gut instincts... and that would be priceless.
Context first - I have been meaning to repair this poor drywall installation/missing drywall in my spare room for a while. I decided to take a stab at it this weekend while the room was vacated. The primary motivation is to make sure there is drywall along the bottom of the wall so I can install baseboards. [I've already installed baseboards in my room, but will have to blog about that later.]
A section of drywall had been replaced by a previous owner, but it was cracking between the pieces because he/she didn't use drywall tape (see picture above). I cut out the piece of drywall between the poorly-installed one and the access panel to the bathtub plumbing so I could replace the whole section with one piece.
The continuous piece includes a section below the tub pipes so I can install a single piece of baseboard along that wall. I'm planning to replace the plywood access panel with a drywall access
While I had the wall open, I decided to insulate my hot water pipes some foam pipe insulation. There's a lot going on in the wall, so I had to cut some of the insulation to fit around the drain pipes. The insulation seemed snug enough and there appeared to be enough space for the drywall.
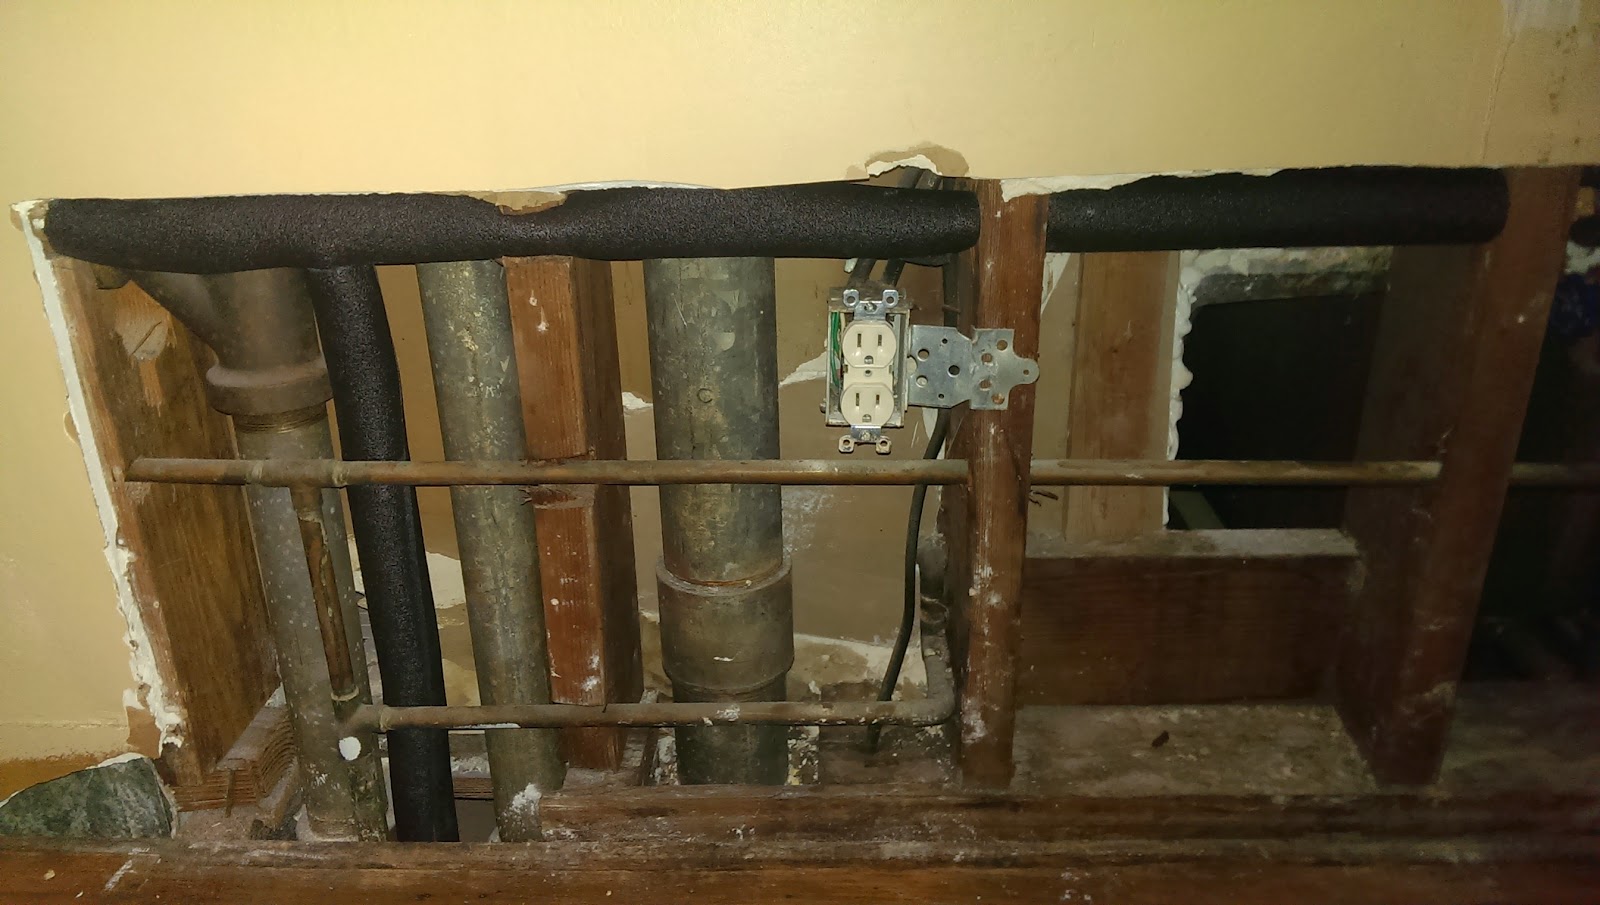 |
| Black foam insulation along one vertical pipe and top horizontal hot water pipe |
I also needed to cut out a hole for the electrical socket, so my utility knife got a lot of use. So far so good. I started to screw it in and it fit! I was a little nervous about that because of the added pipe insulation. Just a few more screws and then I'd be ready for the hard part... drywall tape and mudding. And then I did something really really stupid.
I drilled right into a pipe... yep, I could hear water spewing. However, at first it sounded like air, so removed the screw and water went everywhere. You should have seen how fast I darted down 2 flights of stairs to my water main to turn it off!
 |
| uhoh |
I called Roto-Rooter for some emergency plumbing and Lee came to fix it for me for $250. He also showed me how to fix a section of pipe while he was doing it and we were chatting. [Guess who needs a pipe cutter and solder! :)] He was really entertaining. I learned all about his family and a ton about his past history. He made the experience so much better. He could have said, "you should have called someone else to do this type of work," but instead he was very encouraging about all of the work I put into the house. He said homeowners need to know a lot more about their homes so they don't get "taken" (and proceeded to tell me a long story about a horrible contractor and a nice elderly woman). He applauded my independence. His parting words were "Miss Laura, keep on drilling" to which I replied "...in the right places."
Sometimes DIY isn't easier on the wallet, but it's humbling and character-building, right? Maybe I'll even learn to listen to my gut instincts... and that would be priceless.

Saturday, March 7, 2015
Caulk - Necessary Evil
I have a caulk-adversion thanks to the previous residents of my home (see this and this), but the real truth is I don't like dealing with caulk even for its appropriate uses. It's messy. It doesn't matter how gentle I am, it continues to come out of the caulk gun when I don't want it to. Plus there are the times I'm clumsy and let it drip on my bathroom rug (let's just say it's not my day). It doesn't store well if you aren't using it all at once... and who uses a whole container of caulk at once?
But there are things homeowners need to do even if they don't like it and I needed to stop the water that gets outside of my bathtub from raining into my kitchen (eek!). So if you have to use caulk and are not a fan, here are ways to make the job easier:
1 - Have paper towels on hand... trust me
2 - Keep goo-gone around - It got the caulk out of my rug easily and makes hand washing much easier.
3 - Get handy little caulk caps to help keep it from drying inside the cap. I normally use plastic wrap with rubber band, which works all right, but I'm hoping this is better.

4 - Buy the dap brand with screw off cap... it's about time! You can take the cap off and clean it out (with the paper towels from tip 1) so that it doesn't harden inside.
 Ok... maybe caulk is growing on me a little... and I better get used to it because I'll need to finish off my baseboard installation. I'll have posts on that topic soon.
But there are things homeowners need to do even if they don't like it and I needed to stop the water that gets outside of my bathtub from raining into my kitchen (eek!). So if you have to use caulk and are not a fan, here are ways to make the job easier:
1 - Have paper towels on hand... trust me
2 - Keep goo-gone around - It got the caulk out of my rug easily and makes hand washing much easier.
3 - Get handy little caulk caps to help keep it from drying inside the cap. I normally use plastic wrap with rubber band, which works all right, but I'm hoping this is better.
4 - Buy the dap brand with screw off cap... it's about time! You can take the cap off and clean it out (with the paper towels from tip 1) so that it doesn't harden inside.
Subscribe to:
Posts (Atom)