Showing posts with label workout. Show all posts

Wednesday, October 12, 2016

#ruglife

A new friend and I were joking about our rock and roll lifestyles because of our recent purchases of curtain rod (her) and rug pad (me). Sarcastic enough for you?
Just after I told her that curtain rods have nothing on the rug pad I had coming tomorrow (ya know... because rug pads are WAY more rock and roll), UPS brought it a day earlier than expected! Here's our message exchange and her response cracked me up:
The impetus for getting a new rug pad was because the one I have had for years (see picture on left) was affecting my hardwood floors. Over the weekend, I moved all of my furniture in order to shampoo-clean my hardwood floors. It took longer than I thought it would because the old rug pad was leaving a grid residue. I was afraid the old rug pad would cause some the long-term damage. Plus, it wasn't very soft. I ordered an all-felt rug pad to replace the old one. I didn't need one to keep the area rug in place because the rug is so large and secured under the couch. Once I was done working today, I did even more furniture moving to put the new rug pad under my living room area rug. Unfortunately, the furniture in my living room is slightly too large to move entirely out of the way because it would have been easiest to roll the rug up. Instead, I had to move the couch back and forth twice in order to get the rug pad in the right place and the area rug back on top of it. I'll just count it as a workout. Hopefully, now the hardwood floors will be protected and even though it's not the thickest of rug pads, it's better than the old, grippy, grid one.

Rockin' and Rollin' Lifestyle!

Sunday, April 3, 2016

Demolition

It's big project time again! I lost momentum for a while, but spring is bringing back energy and motivation. I was hoping to dig more post holes for fencing in my backyard yesterday, but "they" were calling for rain all morning (it didn't... see one of my favorite tweets to the right).

Instead of working in my yard, I decided it was time to get rid of the built-in shelves in my spare room/office. They're too deep to be convenient storage and there's a ton of unusable area above the top shelf. Eventually, I'll put in a large closet so the small closet on the left had to go too.

There's something satisfying about demolition. It creates a clean start and opportunity to make something better. Plus, if you have any pent up aggression, kicking drywall is a great outlet.

I had a lot of quality time with my hammer and pry bar. I started with the closet because once I removed the drywall next to the shelves, I knew they'd be easier to remove without entirely destroying them. I was making enough of a mess as it was. I used a hand saw to help remove the last 2 wall studs. One of the other great things about demolition is that it requires fewer tools (and, thus, fewer trips to my basement) than other house projects.

I haven't cleaned out all of the junk, but here's the newly opened space and the result of my hard work.

Wednesday, June 4, 2014

Pallet compost bin


My brother and I had put together an amazing compost bin in 2010 from salvaged trash in the industrial park near my house. Three and a half years of storing decomposing matter later, it was SPENT! Last year I flipped it over and used the top as the new bottom by attaching a new piece of plywood, but it was in very sad shape this year. This picture is after I pulled off one side of it in order to more easily move the compost. The decayed sides you can see used to be part of the bottom. I can't complain because its contents filled my gardens, which provided me with lots of food. But it was time to upgrade the bin.


Conveniently just in time, a neighbor had some leftover pallets from a materials delivery for a project he was doing. I used them and some mesh that another neighbor had put out for trash to make a new compost bin. The pallets had the wood supports (front and back of bin in the picture below on the right), so instead of removing them, I just left them to be part of the bin. The mesh keeps the compost inside the bin at the back. The best part is that I also have another discarded pallet and extra wood supports so eventually it will become a double-bin, which will make flipping the compost much easier. I may even extend it to a triple-bin with another two pallets, because that will be extremely helpful in the fall when there are a ton of leaves to compost.


I moved a lot of the compost into the new bin, but that stuff is heavy and I had enough of a workout putting everything together. I'll move the rest later and it will be ready for my garden next year!

Here's a descriptive source with more information to make your own.

Tuesday, October 15, 2013

Rust is my enemy, WD-40 and my Dremel are my friends.

I thought that replacing my toilet seat was going to be simple. Remove some bolts, remove the seat, clean the toilet, put on new seat, add the bolts. Yeah.... that's not the case when the bolts are extremely rusted! Adding WD-40 helped with one of the bolts, but even so, my arms were extremely sore from trying to get the first bolt off. Look at how gross it was. A tip from my younger brother that I learned after I replaced the seat: the product PB Blaster would have done the job a lot easier and it can be found at auto stores near the WD-40. I'll have to get some of that if I have other problems with rust.


The second bolt was somewhat stripped and I was unable to get it to budge from the plastic nut underneath the toilet. I was frustrated and tired and unwilling to go through a tougher version of what I had just endured with the first one. I put a drill bit in my dremel in order to break the nut away from the rusted bolt. Drilling on either side and using needle-nose pliers let me remove it entirely and much easier!


Installing the new toilet seat was simple. The great things about it are that it matches the toilet (the old one was not quite white) and, at my mom's recommendation, I got a quiet-close seat. Recommendation, I got it from Bed Bath and Beyond with a 20% off coupon, so it was cheaper than had I bought it at a hardware store.

This is not in slow-motion.
Gravity-resistance = Quiet-close

Monday, July 9, 2012

Adventures in insulation - Phase 3-hour-workout

My neighbor's next-to-nothing insulation looked like this across her attic:


The temperature dropped to the 80s so we decided to tackle the insulation in her attic. It was still really hot up there and took some contortion in order to get the bundles in the back of the small angled portion of the attic, but we did it with the help of one of her friends in about three hours. Like many sports, we took time-outs and water breaks; we had our endurance tested and sprinted at the end; we had to think out strategy and execute; and got very very sweaty. I mean... check out my oompa loompa get-up.

Anyway, I'm pleased to post this picture of her newly insulated attic! We're exhausted, sore, and even itchy, but have planned to do this to my attic on Wednesday night. We feel like we have a good system down and are hoping to be able to do it in 2 hours this time! Wish us luck.


Sunday, July 8, 2012

Adventures in (more) insulation - Phase Transportation

Both my neighbor and I need insulation in our attics. She has next-to-none and I need to supplement the foam insulation. We decided it would be most cost effective if we bought it together so that we can get the "contractor's discount" of 10%. Unlike contractors, we lack trucks. It took two trips to Lowes with 2 cars each time to transport our 13 bundles of insulation. They're heavy bundles and took some convincing to fit in the cars, but we did it! Only a few were slightly mangled, so they may not be as "sexy" (it's a safe link, I swear) as they once were, but they'll still do the job.

Car stuffed full!
Plus what you can see,
there's a bundle in the trunk of this car too


Saturday, June 23, 2012

Deck framing begins!

I had a crew of 10 come work on my deck today. There was a lot of measuring, squaring, leveling, and cutting to be done! And hammering! There were some master-hammerers putting together beams today. The beams needed assembling because three of them had to be made of two 2x8s and one had to be made of three 2x8s. There was some muscle-building because the lumber was in the driveway, so my great friends hauled everything to the backyard.
We cheered when things were leveled and spent plenty of time over-analyzing the next steps. And, of course, there was the obligatory trip to the hardware store to pick up extra items (so grateful to my friends who were willing to run that errand for me).
My shady backyard kept us cool enough, but we welcomed the occasional breeze and there was plenty of water (and sangria) to go around. Once we got to this point:


we went inside to have some tacos, ceviche, snickerdoodles, and more sangria. A great day and lots of progress!

Friday, June 22, 2012

Side yard landscaping

Two things that brought me joy this spring are:
  1. My city's free mulch
  2. My fantastic neighbor who has a similar affinity for free mulch AND has a great boyfriend who lets us use his truck to get said free mulch! 
I decided it was time for a side-yard makeover, so 1 1/2 loads of free mulch later helped this:


turn into this (opposite view):


Wednesday, June 13, 2012

On the other side of sore

Today I'm feeling almost back to normal. After carrying and mixing 80 lb bags of concrete on Saturday I was extremely sore until this morning and my bruises are starting to fade. I had four amazing friends (whom I have given unexpected super hero nicknames in this post) come help me to haul, mix, pour, and level concrete! On Sunday, my friend, The Supreme-Concrete-Hauler, said he felt like someone beat him up in his sleep. I'm going to be ripped by the end of this project. Well, maybe not if I keep eating like I have been. I made banana baked french toast, a delicious egg bake, and pizza for our sustenance... and we certainly needed it. At first we were mixing the concrete in the holes because there were 3 of us doing mixing at a time, but in the afternoon when there were fewer people, we mixed the concrete in the wheelbarrow. It was much easier that way and my new wheelbarrow looks well-used now.

We were able to mix 2 bags at a time in the wheelbarrow. Tip: Make sure you rinse the concrete out of the wheelbarrow if you're taking any sort of break between mixing loads because concrete can dry pretty quickly. Luckily, The Master-Leveler would do the leveling while The Mixing-Hero and I stirred up a new batch of concrete so that concrete wouldn't dry in it.
A shout-out to the worker at Home Depot who loaded both loads of concrete. I gave positive customer feedback on their online survey... here's hoping I win the $5000 gift card. HD trip count for the day was 3 trips. Here's the truck being weighed down by a ton of concrete and a wheelbarrow.
The tools and hoes were in the cab of the truck. The Extreme-Errand-Runner got a kick out of my "Hoes, be quiet back there" when they clanged around on our trip back. Unfortunately, the wheelbarrow tire wasn't inflated enough for transporting the concrete the 1st load of concrete. Fortunately, my neighbor lent me his bike tire pump before unloading the 2nd load!

Monday, June 4, 2012

Phew! Done digging holes and I feel like superwoman!

Thirteen of these
later...
and phase 1 of deck building is done. It's the demolition phase, so I'm pleased to announce that my backyard looks worse than ever.
Dirt pile and dog
Holes and hole covers (chairs, dog house, etc.)
I dug 12 of these holes to be 22 inches square and 24 inches deep (four are 28 inches deep... one of which Steve handled). This includes dealing with downpours that required removing some mud and cutting roots.

Phase 2 is creating concrete footers! But not until after phase 1.5 - hole inspection... coming this week. Let's hope they pass!

Sunday, May 27, 2012

Halfway done digging holes!

I've worked really hard the past 2 days digging and measuring holes for my deck footers. These are impressive holes: twenty-two inches square and between 24 and 28 inches deep! I have 6 holes completely done and three partial holes dug. I'm taking a break in the heat of the day, but may work on them more later tonight. So far I haven't broken any nails, but I do have some blisters forming.

ps. This is my 100th post! 2 accomplishments achieved :)

Saturday, May 26, 2012

2 ft of concrete

I began digging holes for my deck footers soon after getting my permit. Fortunately, only one of my footers conflicted with the posts of the old chain link fence. Unfortunately, one footer conflicted with a post. That post was set in two feet of concrete!!!
I started to dig around it and realized at one foot deep that it wasn't moving at all. My coworker lent me his heavy concrete breaking tool.

It's pretty awesome, but would have taken me forever to do. Steve, however, dominated that concrete! Here's what's left:


And not only did he do that, but he hauled it out of the hole on his own and then dug the hole to 28+inches deep and 22"x22" square. Twelve more holes and I'll be ready for 1st inspection! Well, I have one other pretty much completed and some others partially done, but a lot of digging still left to do.
This deck will not be going anywhere when it's built on that much concrete. And it's going to be awesome!

Wednesday, May 18, 2011

Veggie-garden taking shape

 About a month ago a friend came to help me get and haul forty pound bags of top soil to fill my raised bed. He helped me layer the soil with compost and peat moss to make this beautiful garden. We also used some of the compost from my bin and turned the rest. Thanks Steve! While we were working in my garden, my neighbor inquired about what I was planting and when I told him vegetables, he offered to share some seeds a friend had given him, so I started my 2nd round of seedlings (basil, thyme, peppers, and rosemary)
partially filled (April)


Since the likelihood of frost had passed, I planted my lettuce seeds toward the front of the garden; peas and sunflower seeds went in the back. A couple of weeks later some people at my work were selling seedlings for a fundraiser, so I bought 15 seedlings for $5. I bought mostly tomatoes (4 different varieties) and peppers (both bell and spicy). I also picked up some cilantro and basil. When I planted those, I added a row of carrots. I also planted seeds of the jelly-bean-tomatoes and eggplants that I wasn't able to get to grow as seedlings. I planted some okra too. And to round it all off, last week I got a seedling of a Thai green eggplant from my farm share. I'm still hoping to find a stevia plant somewhere. I'll call some local nurseries this weekend to try to track one down. Anyway, a month after filling, see the picture below of the status.

My animals examining hydrangea bushes.
Sunflowers and the peas are in the garden.

Lettuce and other plants
protected by poultry fencing (May)

Thursday, May 5, 2011

Seedlings fail


Well I meant to do a post about my seedlings a long time ago. It's a good thing I didn't because I'd still need to do this post that would pretty much make any prior post obsolete. My seedlings ended up dying before I was able to plant them outside. I suspect that after they sprouted I watered them too much and the roots couldn't get a good hold. Now that there's not a chance of a frost I will throw some jelly bean tomato seeds (a small tomato variety) and eggplant seeds in my garden to see if they'll grow. I have started a 2nd batch of seedlings... this time of basil, thyme, peppers, and rosemary. One of my neighbors gave them to me when he saw me preparing my raised garden bed. I'm trying the every-day-spray-bottle method so I don't over-water them. It may be slightly more time consuming, but it's a good hand workout and will be worth it if they don't die prematurely.

Has anyone out there had success using egg cartons as seedling starters? I read that they work and I like reusing "trash," but I fear there are problems with them.

I made my own little labels with toothpicks and post-its covered with tape. That did work well. - minor victory.

Monday, August 16, 2010

Spreading the grout... with help from the younger bro!


   This is not the proper method for spreading grout, but it is actually a good way to get the grout ready to spread with the grout float. We had a pretty good method where my younger brother would spread the grout out and I would use my finger to smooth it in the grooves. He was a little too quick though. I'll need to go back over some spots that dried before I could smooth them well enough. A little work with the dremel or some fine sand paper should do the trick. It's looking much better though.

My tips are:
  1. Smooth the grout with your finger because only using a damp sponge method isn't as good. You'll need a bowl to wet your finger so that it smooths the grout instead of removes it.
  2. Use a damp sponge to clean up the tiles 20-30 minutes after the grout has set.
  3. Do one section at a time (spreading and smoothing) mixing the grout frequently to keep it soft and taking breaks b/c the hands get pruney/wrinkly really quickly.
  4. Cheesecloth is great for taking off the haze. Wipe the surface with it a couple hours after letting the grout dry. And wear a mask b/c it's dusty.
I'm sure to have more pictures and tips by the time I'm done with this project, but I really needed the break and wanted to share this silly picture.

Friday, May 14, 2010

Ceiling fan installation

The DC area seems a bit confused about what season it is. One day it feels like spring, then we get a taste of summer, we think we've jumped straight to fall, but then we're back to spring. I'm not fooled though because I know summer is approaching so I decided to prep my room for humid summer nights. The house has central air, but I grew up in the south without AC, so I'm well versed in the benefit of air movement via ceiling fan. I also think it looks nicer than this light.


I won't go through the whole installation process because fans have instructions included. There are some tips and tricks that will make the installation process easier.
My first tip on ceiling fan installation: Don't do it alone. This is important for 2 reasons: dealing with electricity is never a solo project and there are too many pieces for 2 hands. I got Emily to help me tackle this project for her first visit to my house (she'll have the opportunity for revenge since she just bought a home).
Second tip: Turn off the power to the light at the fuse/breaker box. Dealing with electricity is much safer when you cut the power. Electrocution is bad.

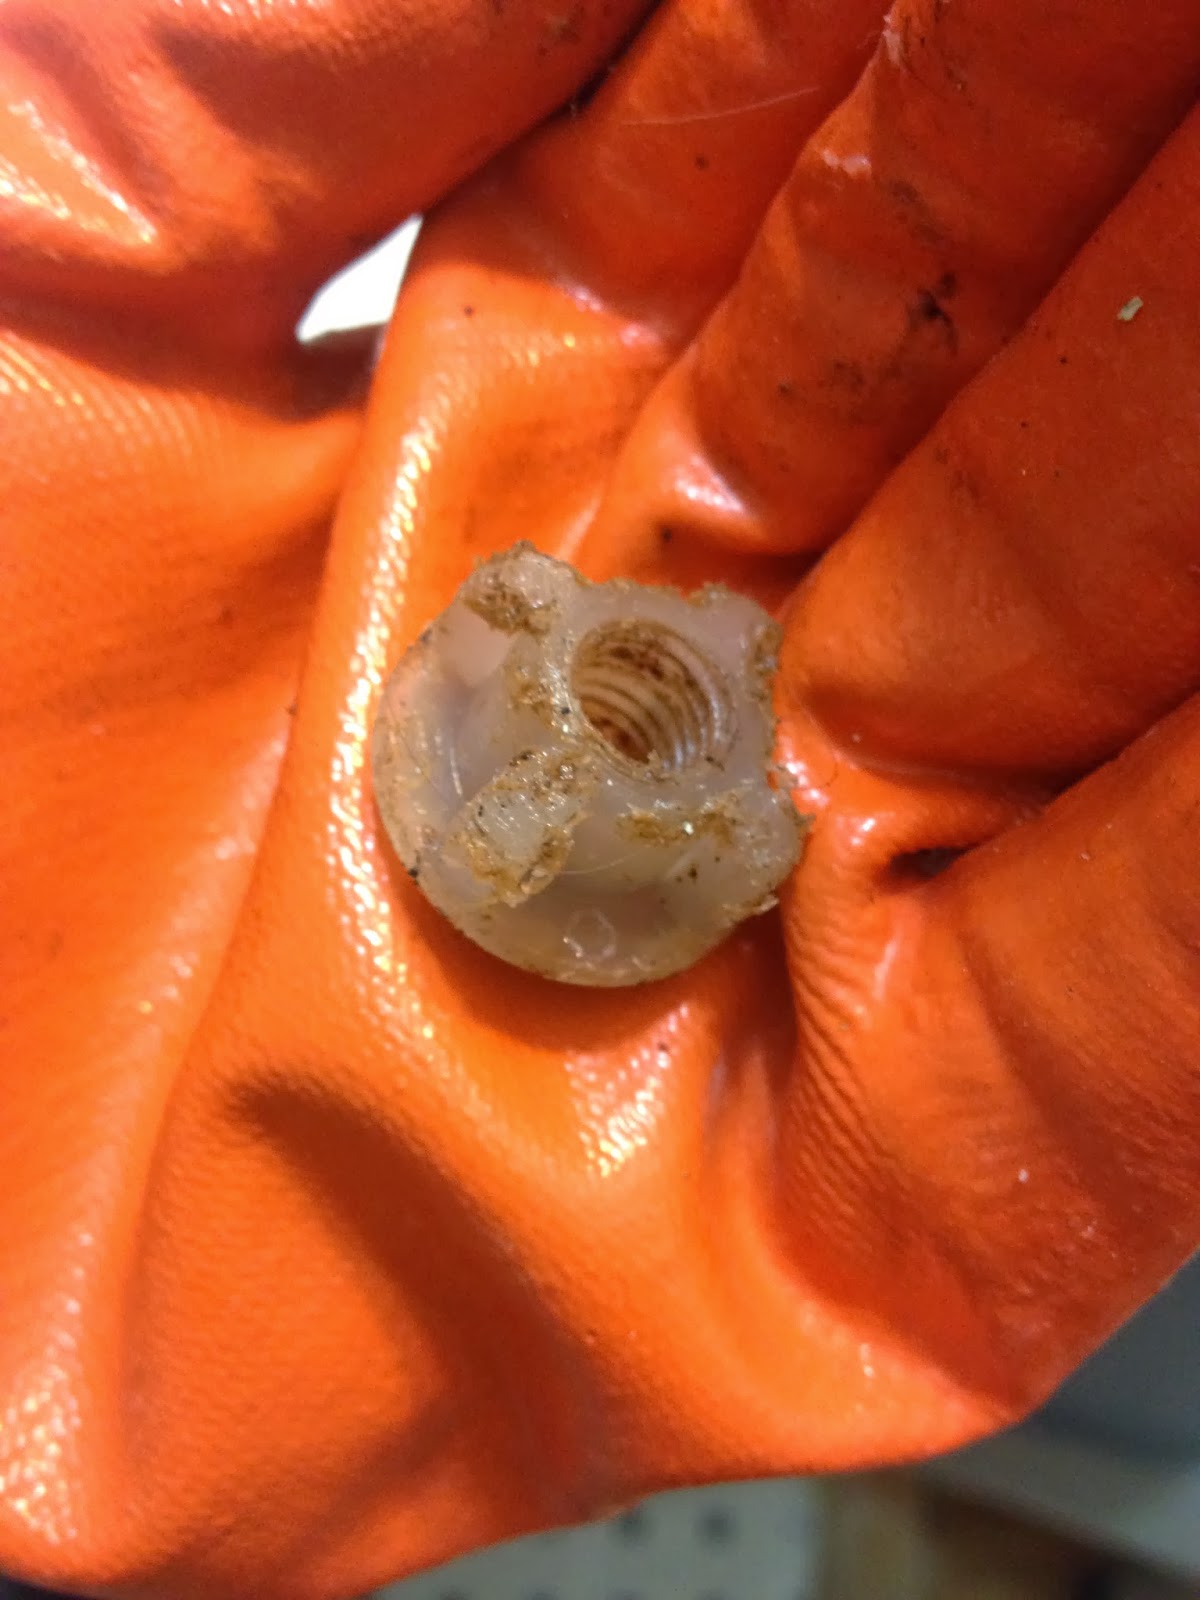
Since I was doing a flushmount installation with the ceiling fan, I had to insert some small screws at the very top of the fan. The ceiling got in the way. More than a couple of times, we dropped the screws... that wasn't a big deal until one fell into the fan. I had to disconnect the wires, remove the fan, get the screw out with needle-nosed pliers, and essentially start over. This happened twice when my patience ran out and I covered the holes before trying again. Save yourself the hassle and use this better plan: before starting installation, use some masking tape over potential holes in the fan that screws may fall into.
Another problem with the close-to-ceiling screws is that the threads didn't want to line up. The needle-nosed pliers came in handy again. I used them to hold and guide the screw while using the screwdriver, and it caught the thread and glided in.
The end result is this awesome fan.


I should also warn you that ceiling fan installation does require upper body strength. Be prepared for a good shoulder workout.

Wednesday, April 28, 2010

Stretch before gardening

I pulled my back gardening a couple of weekends ago. I'm in my 20s so that really shouldn't happen, but it's taught me the lesson to stretch my back regularly... especially before doing yard work. In my defense, I had been working on my core at the gym, which probably tightened my back too much in the previous weeks. You'd think the bags of mulch I hauled would have caused me to hurt my back, but instead it was pulling on a tree root.
Luckily my regular gardening helper and a couple of other friends were able to help me plant the shade garden and the rest of the plants that my mom got me. Due to the tree roots, I was unable to plant the hydrangea bushes where I wanted to, so they're currently growing in pots. Not ideal, but I'll find a good spot for them eventually.

Once things start to bloom, I'll post more pictures. I just wanted to pass along my advice before it was too late for you :)

Sunday, March 28, 2010

A Tilling Weekend

The snow is gone and spring has arrived! The weather was beautiful this past weekend so my parents and I spent most of their visit working on my yard. The yard, like the rest of the property, has been neglected and was full of crab grass. The ground was so uneven that my push mower was very difficult to use. My yard isn't very large so I decided it would be best to reseed the whole yard. My boss lent me his tiller attachment to loosen up the soil. Now, don't let "attachment" fool you into thinking this is some light, easy to use machine. A normal tiller has wheels to push along the ground, but the attachment to a weed-eater motor means no wheels. You have to hold it the whole time, pull the trigger, and push it into the ground deep enough to get under the grass. My arms (forearms especially) were sore the next day (I'm making my way to madonna arms afterall). It's heavier than it looks, but it did the job:


My tips for tilling:
Be patient and take your time. I wanted to get the tilling done so instead of wearing my arms out too much, I rested some of the weight of the machine on my hip... it bruised.

Having help is also a great option. (Big Thanks to my dad who did a lot of the tilling).

If the yard is a decent size then rent a larger tiller.

There are a couple of spots that were really thick with crab grass and a larger tiller would have been helpful for that. So if the whole yard is really overgrown (even a small yard), rent the larger tiller.

Friday, February 5, 2010

Snowmageddon DC!

Here in the DC area, we're supposed to be getting up to 2 feet of snow (http://snowpocalypsedc.com/). This will be our 2nd bout of that amount of snow this winter season and we've had smaller snow storms too. DC hardly ever gets this much snow, so there aren't enough plows to clear it quickly. This means I get to hole up in my home and work on house projects, which could mean more blog posts... get excited! I don't expect to have any finished products this weekend but if I can get the walls better prepared for a big painting party at the end of the month, then I'll be happy.


Regardless of what I'm able to accomplish for inside house projects, I will be working toward those Madonna arms by shoveling snow.
Luckily, some friends who knew I was looking for a snow shovel picked one up for me when they were successful with their search. Now I won't have to only sweep (although, I do recommend getting a push broom  b/c they're really helpful for clearing snow as well as cleaning debris for refinishing floors) and use a garden shovel.


USEFUL FOR SNOW ->

<- HEAVY

Sunday, January 31, 2010

Satisfying paint peeling

I wasn't intending to do any more house projects this evening after my shoulder started hurting (probably a combo of show shoveling, yoga, and drilling plaster walls), but out of curiosity I picked up a large putty knife and thought I'd see just how easy it would be to scrape more paint off of my bathroom walls. As I mentioned in my first shower rod post, the paint started to peel off when I took off the old shower rod. Before I knew it, I finished peeling the paint off of most of one wall in the bathroom. My belief is that previous owners had painted over wall paper, so what I was actually scraping off of the wall was painted wall paper. The wall currently looks horrible because the already-ugly green paint is discolored from having wall paper over it, but it's going to be a common theme that rooms look worse before they get better (I even created a new blog label for that theme). I don't even care though because peeling that wall made me feel like I made some decent progress on updating my bathroom. And my friend Jenn described it right when she said it was really satisfying to peel paint from walls (she learned this during the bubbling paint fiasco).

satisfaction looks like this