Wednesday, February 15, 2017

No more tangled necklaces!

I've gotten some really cool necklaces as gifts over the past few years, but didn't have a great place to put them. My jewelry box has a spot for a few necklaces, but they would inevitably fall off the hooks when I closed the lid. I had some necklaces hanging from bobby pins stuck in my book shelf, which worked for 2 or 3 necklaces, but 7 or more was overkill. I turned to the trusty pinterest to look for ideas for necklace storage and found one that uses upholstery nails and a piece of trim. I had plenty of trim laying around and upholstery nails were only a few dollars for a pack of 20.

I cut the trim to 24 inches to parallel the towel bar in my bathroom so I could use the empty space above it. Appropriately, my earring holder (made from a large black and white handkerchief and some push pins) is over my hand towel holder as you can see in this old post.


I painted the trim white, added some saw tooth hooks to the back, put two little nails in the wall, and hammered the upholstery nails at the bottom of the trim an inch apart to hold the necklaces.

I'm really pleased with how easy it was to make and how great it looks.

Wednesday, December 28, 2016

"Made me think of you" gifts are the best gifts

My favorite gifts to give and receive are the ones that are not forced. When I see an item that makes me think of someone in particular, it's hard not to pick up. Bonus = when the item is on sale.
I was recently on the receiving end of an after-Christmas sale item that perfectly captured one part of my identity!
This is the new gift
This is also a gift, but one I've had for 6+ years
I immediately put it out to display, but it didn't seem quite right in that spot. While I was thinking about alternative locations, I also thought about what I wasn't getting to do this week as "dog mom." My mom, aka dog grandma, is watching him this week. [Sidenote - my house is lonely and I miss him.] One of the things I try to do regularly is take him for walks and jogs with his appropriately coordinated red leashes....💡💡💡💡 ←Brilliant idea forming here!

Hrmmmmm... a few hooks and thumbtacks would make my new gift a great decoration for an empty wall AND functional as a leash holder. Previously, his leashes lived on the floor next to the door or in a bag in the closet. A few screw hooks in the bottom, 2 thumbtacks in my wall, and a little help from my dremel resulted in this amazing addition to my living room. A thoughtful gift became a creative project for me. Wins all around!


Wednesday, October 12, 2016

#ruglife

A new friend and I were joking about our rock and roll lifestyles because of our recent purchases of curtain rod (her) and rug pad (me). Sarcastic enough for you?
Just after I told her that curtain rods have nothing on the rug pad I had coming tomorrow (ya know... because rug pads are WAY more rock and roll), UPS brought it a day earlier than expected! Here's our message exchange and her response cracked me up:
The impetus for getting a new rug pad was because the one I have had for years (see picture on left) was affecting my hardwood floors. Over the weekend, I moved all of my furniture in order to shampoo-clean my hardwood floors. It took longer than I thought it would because the old rug pad was leaving a grid residue. I was afraid the old rug pad would cause some the long-term damage. Plus, it wasn't very soft. I ordered an all-felt rug pad to replace the old one. I didn't need one to keep the area rug in place because the rug is so large and secured under the couch. Once I was done working today, I did even more furniture moving to put the new rug pad under my living room area rug. Unfortunately, the furniture in my living room is slightly too large to move entirely out of the way because it would have been easiest to roll the rug up. Instead, I had to move the couch back and forth twice in order to get the rug pad in the right place and the area rug back on top of it. I'll just count it as a workout. Hopefully, now the hardwood floors will be protected and even though it's not the thickest of rug pads, it's better than the old, grippy, grid one.

Rockin' and Rollin' Lifestyle!

Go ahead. Eat my pumpkins now, squirrels!

My garden hasn't had a huge yield this year. I have had pests like squash bugs and harlequin bugs. I had too alkaline soil. And the squirrels got some of my tomatoes. The only crop that had a ton of yield was my ghost pepper plant.


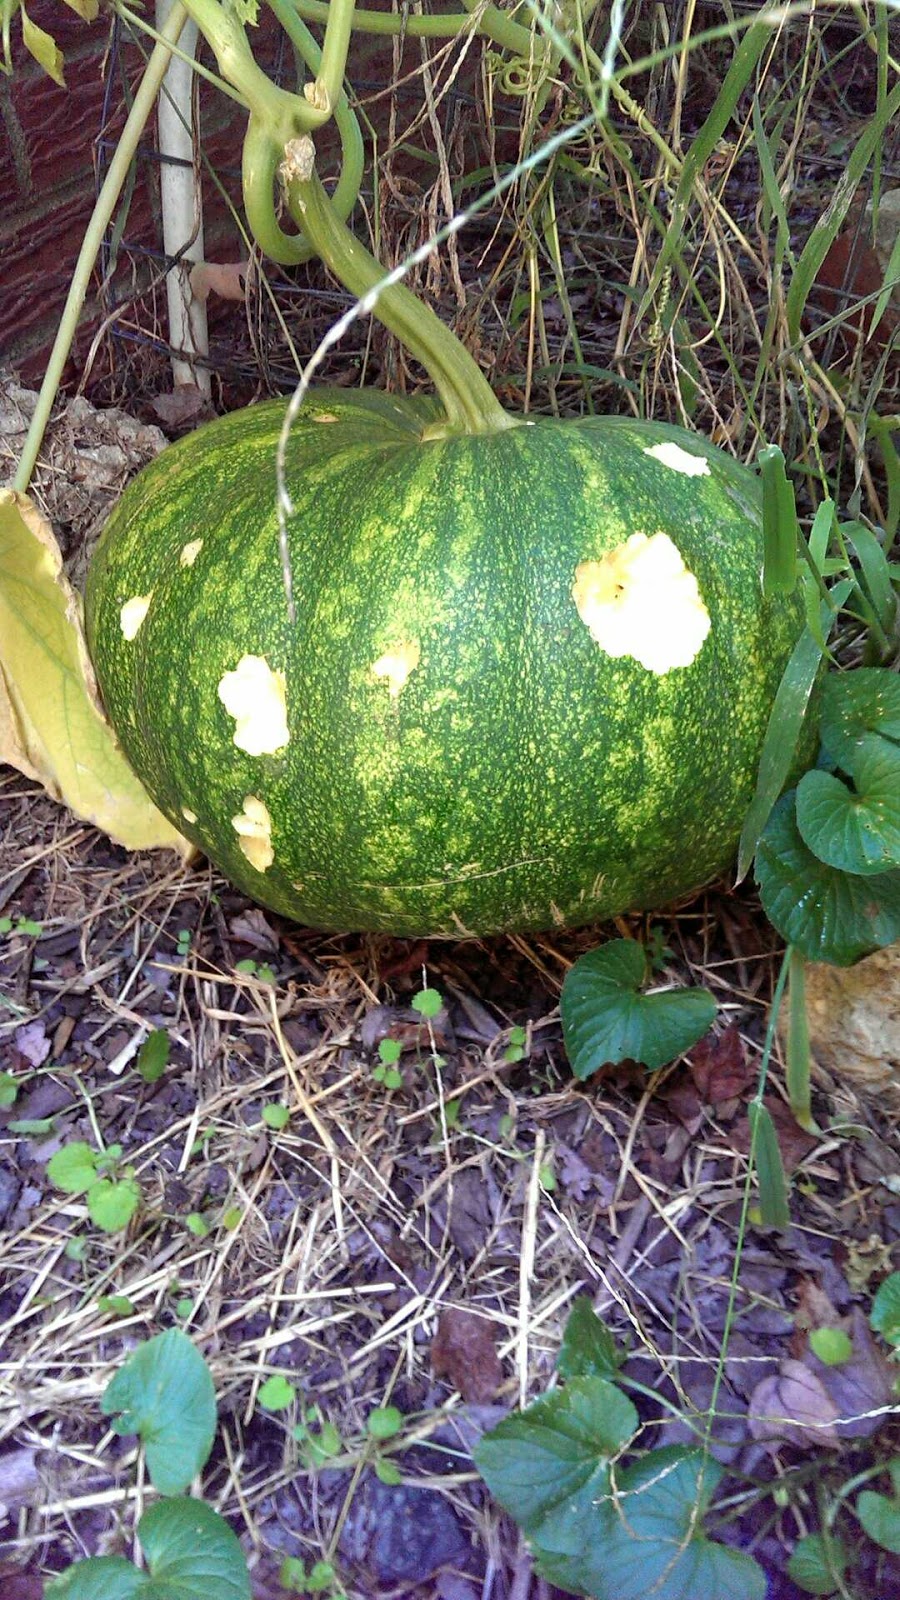
I was sad that I only had 2 pumpkins, but happy they were impressively large. Then I saw this happened to the younger of the two...


UGH! I hate squirrels. Luckily, my one high-yield crop is the perfect defense! I made a homemade pepper spray with a chopped up ghost pepper and hot water. I made sure not to touch the pepper so I wouldn't hate my life. I could smell the heat. The rest of the process was done on my porch b/c I didn't want to risk spicy vapors in my home. I poured the hot water over the chopped peppers in my measuring cup and after letting it soak for a few hours, I poured the water into a spray bottle. The soaked peppers went straight into my compost bin, where the squirrels also occasionally frequent. I thoroughly sprayed the pumpkins. The squirrels will better stay away or THEY will hate life. The exciting news is that I have at least 4 new, tiny pumpkins starting and they have been ghost-pepper protected too. I have some spray left to reapply as they grow or in case it rains. Hoping it works!


Sunday, October 9, 2016

Bathroom Base Tiles


I continued my slow remodel of my bathroom by installing base tiles. Like many of the walls in my house, the walls in my bathroom were also in poor shape. I had some fun times with plaster as you can see around the venting. I had installed some of the tiles earlier, but couldn't get to the space behind my vanity without unhooking the water and moving it away from the wall. I've been trying to check items off my to-do list so I took a weekend to complete the project by doing wall repair, adding tiles, framing out the duct vent, adding a vent cover, grouting tiles, and caulking.

When I turned off the water and unhooked the hoses, there was still a slight drip. I had to come up with some innovative ways to contain the water while still giving me access to the wall behind them. I used rubber bands, bags, and buckets (see picture below). I was able to install the tiles in a day and used the next day to grout and caulk the tiles. Even though they will be mostly hidden by the vanity, they still look really good.


My phone camera is not great

Friday, September 16, 2016

Paint preserving trick!


My least favorite thing about painting is the clean-up process. My friend Steve was lamenting that he had a lot of painting to do and it's difficult to find a chunk of time to do it all. [BTW - Happy Birthday Steve!] Who wants to spend an hour or two painting followed by 30 minutes of clean-up just to have more painting to do the next day? I recently filled him in on a tip I learned when I was doing a lot of the painting in my house. When I perused my blog posts on painting I didn't see it. I can't believe I haven't shared this yet!

This tip come from my friend Cori who was a huge help when I was painting my house! In addition to doing a lot of the painting (including ceilings which she does FAR superior to me), she showed me that you can wrap rollers and paint brushes with plastic wrap to keep the paint wet if you need to do more painting the next day

Steve can attest that it works. In fact, here's an email I got from him the other day:
"I finished painting a bedroom yesterday.  Your plastic wrap suggestion worked like a charm.  Thanks for the advice."

Wednesday, September 14, 2016

Baseboard finishing

Sometimes I just need to blog so I have a reminder about the little things I have done around my house. I may have mentioned before that this blog has been really helpful when I get overwhelmed with all that I have left to do. I go back through my posts and realize,  "wow! I have done a lot" and then I don't feel so bad.

This post is one of those situations where I don't have much to say about my experience caulking the baseboards and filling in nail holes with spackle. I spent a Saturday in June doing that for all of my baseboards downstairs and used a full tube of caulk. On Sunday, I used up another tube of caulk doing that for the baseboards in my bedroom and around most of the doors that I installed upstairs. I have gotten better about caulkOne tip that I may not have shared before is have rags and a little container of water nearby. Smoothing caulk is much easier if your finger is wet.

A few weekends ago, I installed the shoe molding in the little landing/hallway upstairs, so that area is pretty much done. Making progress!

Monday, September 12, 2016

Closet makeover

In one room, I removed the whole closet. Meanwhile, in the other room, I decided to use the space more efficiently by making it a mini walk-in closet. The original layout had a single rod stretching 5 feet across the back of the closet and one shelf above that (see picture below).

I was in town over labor day weekend and had an extra rod after demolishing the other closet, so I spent one day adding an extra foot of hanging storage and special storage spots for my hats and my luggage. It only took 1 trip to home depot! I had to get a labor day present for myself (that's a thing, right?). I got a large set of spade bits. All of the ones I already owned were too small. These were on sale though!

My carpenter friend gave me some scrap boards that I could use to add trim to the front of the closet. I cut it to size, drilled holes, cut the rods, and installed the pieces all together. I realize that I could have bought brackets for the rods instead, but drilling holes directly in the trim seemed to be the most secure option. Besides, it gave me an excuse to get more tools that will come in handy later. :) Here are pictures of the new rods... well, technically old rods, but newly cut.


Next up, was hanging my ball caps. They had been hanging on a hook that was much too small for 4 hats. I used the space above the rod on the right side of the closest and a few small nails from my hardware stash to put a spot to hang each hat. [Go Nats!]

Up next... and my greatest success... was using the space above the rod on the left for my carry-on luggage. Previously my luggage sat on the floor, but it's light-weight and I'd rather use that floor space for my hiking, rain, snow, black, and brown boots. I used more of the scrap wood to make this little bracket. I installed a small wood piece above the original trim in the closet with drywall screws and screws. Then, I cut 2 triangle pieces that I fit over some nails that I secured into the small piece. In case you were wondering, yes, I did use another spade bit to drill the holes into the triangle pieces. :) To finish up the bracket, I secured the bottom to the original trim.

Even though it only took a day, my closet feels much more open and organized now. I still want to find some cool hooks to hang my belts, so I'm hoping Habitat Restore will have some in stock.

Sunday, June 19, 2016

Repurposing ugly chandelier parts to make a new light fixture

Saturday was one of those unique days where I got to be creative AND handy.

My chandelier had been held up with painter's tape for almost 7 years so people wouldn't run into it in my tiny dining room. The chandelier was ugly and dated. I wanted to replace it for quite a while and recently took a stroll through the light section of Home Depot. I didn't see anything I liked. I knew I didn't want another chandelier because having a light hang low in such a small room didn't make much sense to me. The flush mount light fixtures were ok, but kind of boring. I figured I would keep working on other projects and eventually would make it over to Lowes to check their light stock. Until then, the ugly chandelier stays. However... as is often the case... my plans changed. One of my great friends, Kelli, was visiting me and suggested we take a trip to Habitat Restore to check for light fixtures. I had not been to the Restore since it moved 2 miles from my house, so I was long overdue to check it out. Plus I had some stuff to donate. It would be a win no matter what we found there. Well, I found inspiration!!!


On the left - ugly chandelier. On the right - you'll see the new light fixture that I created. I found the brown lamp shade for $5 at restore and thought, "I'm going to find a way to make this work." So, Kelli and I made a trip to Home Depot for the other supplies. I was hoping to find something already put together (ceiling mount, connectors, light bulb socket, wires), but that would be too easy. Instead, I came across the lamp-making section. I found a ceiling mount that I liked and from there it was like a puzzle to figure out what else I needed. I grabbed a package of zinc plated nipples (no, I'm not making that name up) and some sockets... and suspected I'd need to make at least one more trip to HD for this project (spoiler alert - I didn't!).

When I got home, I turned off the breaker to the dining room electricity and got started by removing the chandelier. I realized that this ugly chandelier may actually be useful... in pieces.

talk about a puzzle...

I disassembled the whole thing and realized that it had a nipple that wasn't entirely threaded (in other words, one that would look better). It also had some other pieces I could use... and I could save some $ by returning the unused ones pieces to HD. I took the wires out of the chandelier, scavenged some of the connectors, and began reassembling.


I attached the socket to the nipple that I got from the chandelier and threaded the wires though both. Using wire cutters, I stripped the ends of the wire to reveal fresh copper and I twisted ends. I attached the exposed copper pieces to the socket screws and slid the lamp shade over it all. Then I had to attach it to the ceiling mount. I ended up taking the bracket on and off a couple of times because after I put it up, I realized it would be easier to attach the nipple to the bracket before screwing the bracket into the electrical box, but eventually got everything situated.

I'd like to say it that was the end of the installation, but this morning Kelli and I both realized it would look better if it were slightly lower. I pretty much took it all apart, added more connectors from the old chandelier, and reassembled. Now it spreads out the light more and gives a better view of the ceiling mount... but it is not too low to knock most people in the head. My unusually tall brother may graze the bottom because it's now 6'7 from the floor, but he's used to ducking lights, so I'm not worried.


I may get a brighter light bulb for it at some point, but for now it's great!
I suppose I will have to take another trip to HD to return the unused nipples and extra socket, but I don't count that as an extra trip for this project because the returns aren't necessary for completing the project. Especially because I'll be back over there soon enough for my next project, I'm sure. Once I return the items, this project will have only cost me around $16!

Sidenote... at Restore I found some "retrofit recessed lights" that came with LED bulbs. I ended up getting 5 LED bulbs for $14 and I may be able to used the recessed light pieces in my basement eventually. SCORE!

Thursday, May 19, 2016

Fence Panels

I've had fence panels for a couple of years, but had not gotten around to putting them up because of other house projects and yard work. A few of my friends insisted that I get that done this year and have offered to help me install them. The timing is good because my dog and one of the new neighbor dogs behind me haven't been the kindest to each other through the chain link fence. I took my friend Stephanie up on her offer to help last Saturday. We got a break from the rain long enough to install some fence panels along the back of my yard. It's rained most days for the past few weeks. I normally like rain in the springtime because it helps the plants, but there has been a LOT. The plants (and most of the people I've talked to about the rain) need the sunshine too! At least there have been a few dry breaks when I could dig holes and put up some fence posts... and I suppose a benefit of the rain is the ground was pretty soft.

I knew the back of my yard would be challenging because there is a large root coming from my neighbor's yard. Luckily there was just enough space behind the root to dig a hole for the post. However, the fence panel did not fit as-is. My handy skill saw made it easy to cut the bottom of some of the pickets on the far right fence to fit over the root.

The others required some leveling of the soil and removal of some monkey grass before I could attach them to the posts. I split some of my large hosta plants and transplanted them and some monkey grass in front of the fence. I also moved some periwinkle up there too. I want to prevent erosion as much as possible. Since I have tiered the back yard with some landscaping bricks, I contemplated getting a mulch dump from the city to fill in some of the places that need more soil. However, I still have 5 fence panels to install, so I suppose that will need to wait until next year!
Such a difference!


Wednesday, April 6, 2016

Here's some inspiration... Love this!


Such a cool kid.
Sassy too:
"I'm not here to give you shoutouts." 
hahahaha

Sunday, April 3, 2016

Demolition

It's big project time again! I lost momentum for a while, but spring is bringing back energy and motivation. I was hoping to dig more post holes for fencing in my backyard yesterday, but "they" were calling for rain all morning (it didn't... see one of my favorite tweets to the right).

Instead of working in my yard, I decided it was time to get rid of the built-in shelves in my spare room/office. They're too deep to be convenient storage and there's a ton of unusable area above the top shelf. Eventually, I'll put in a large closet so the small closet on the left had to go too.

There's something satisfying about demolition. It creates a clean start and opportunity to make something better. Plus, if you have any pent up aggression, kicking drywall is a great outlet.

I had a lot of quality time with my hammer and pry bar. I started with the closet because once I removed the drywall next to the shelves, I knew they'd be easier to remove without entirely destroying them. I was making enough of a mess as it was. I used a hand saw to help remove the last 2 wall studs. One of the other great things about demolition is that it requires fewer tools (and, thus, fewer trips to my basement) than other house projects.

I haven't cleaned out all of the junk, but here's the newly opened space and the result of my hard work.

Monday, September 7, 2015

Installing Baseboards

I had a dilemma... Do I leave my furniture in the middle of the room or move it all back to reasonable locations? I have baseboards!!! They look great and it's a shame that they are so hidden. Yes, that means I decided to move my furniture back.

I used the long weekend to tackle baseboard installation on the main level of my house and they are all installed! For many, many months they had all been painted, but taking up space in my dining and living room. I installed them in my bedroom earlier in the year and forgot I hadn't blogged about it, so here it goes. My bedroom was a good starter room. The baseboards in my bedroom consisted of one baseboard per wall with inner corner cuts. Four walls. Regular corners (no odd angles). Two doorways. Not too difficult.

Then, there's my downstairs where the living room, dining room, and kitchen all connect without doors, lots of inner and outer corners, and one length of wall that would need 2 pieces of baseboard and 3 pieces of shoe moulding. Let's not forget the flooring transition between the dining room and kitchen because the flooring is not level. This is a picture of the transition (and my cat) and the baseboard with a sketch of the porton that needed to be removed in order for the baseboard to fit around the transition.
 
I don't have a jigsaw so I used a hacksaw, dremel, and my miter saw to make the cut at the bottom of the baseboard so it would fit around the transition. It wasn't perfect, but the imperfect cut would be hidden by the shoe moulding. However, the angles for the shoe moulding were also fairly impossible. My tool that measures the angles doesn't work well with small segments, so I had to recreate the angle with two pieces of paper and then could line up the tool with the paper edges to figure out the angle. For instance, the angle for one transition was around 165 so each piece needed to be at a 82.5 degree angle. I set the miter saw at 7.5 degrees and had to figure out the directions to cut each of those little pieces. Plus, one side needed to have an outer angle cut to fit around the wall (45 degree angle with the moulding positioned a different way). And the other piece needed some sort of angle to fit with the shoe moulding along the dining room floor... but the floor transition doesn't angle all the way to the floor. Of course, there's a slight lip to make it just a little more difficult. 

I didn't stress about it too much though. I did the best I could and used some spackle to make it smooth. I'm pretty pleased with the results. I did fill in the nail holes with spackle, but eventually I'll need to add some caulk and do touch-up paint.

Even though I did my baseboards on my own this weekend. I have to thank Kelli who helped me measure, cut, and install baseboards in my bedroom. She was WAY more helpful than the cat, who was particularly good at photo-bombing. The cat wanted to be in my picture of some of the tools I used for this process. That's a lot of tools. My dining room was the staging room and there were tight quarters, but I made it work.


Warning- the air compressor can get really HOT. I accidentally bumped it with my shoulder and have a little burn mark. Otherwise, I was careful with my power tools and was unscathed.(The yardwork I did this morning was another matter, but that's off topic).

This picture should also have included the tissue box that I used to keep the baseboards level with the miter saw while making the cuts. It served dual purposes because the saw dust also made me sneeze some. :)

Don't they look good?

Wednesday, April 1, 2015

Removing Baseboards

I've had a draft of this post written for a very long time. Now that I'm finally installing new baseboards, I figured I should let you know how I removed the old ones.

I'm pretty sure that the baseboards were original to the house and were pretty beat up. I was convinces they had to go... plus it helped with the floor refinishing process. I bought myself a pry bar and a good hammer and started at it. It was also good that I did this before I painted so I wouldn't mess up a new paint job. The quick and dirty description of how to remove a baseboard is: put edge of pry bar at the top of the baseboard, hammer pry bar behind baseboard, gently pry baseboard away from wall slightly (can be less than 1/2 inch), move pry bar further along the baseboard, and repeat until full baseboard is slightly away from wall, then work your way back to get it even further away from wall until you can pull whole thing out with out damaging the wall. If you try to remove the whole nail before prying the full baseboard slightly away from the wall, you risk damaging the wall behind it.

I ended up some nails left in the walls that I am having to remove now that I'm installing the new baseboards. Some of those need a little engineering ingenuity (in fact, I was told I should have been an engineer when someone saw my methods, but I'll stick with my current profession). Sometimes I've had to use a block for leverage with the hammer or pry bar (I'm pretty certain I learned that trick from Dad). I've also used interesting configurations of the hammer and pry bar to get nails out. Occasionally I've been able to use needle nose pliers to pull the nail out. If all else fails I hammer it all the way into the wall or saw it off with a small hacksaw right at the wall because it's just going to get covered by a new baseboard. I just have to be careful not to shoot a new nail into the old one. Before I install more baseboards, I'll make sure to survey old nail holes and will put a piece of painter's tape on the wall right above the nail to be careful around that spot.


SHARK BITE! The DIY, affordable way to fix copper pipes.

Apparently I'm not the only one who drills into water pipes! Thanks to a blog reader/friend, I've learned of how to fix holes in copper pipes the easy way... no soldering necessary. I'm still glad I saw what the plumber did because I would have made much more of a mess and probably would have been second-guessing myself the whole time. Here's what to do.
For humility's sake, let's put up an image of the pipe again. Yep... hole right in the middle. I did that.


If this happens to you, here is what to do...
1) Sprint to turn off the water main! (hopefully you are reading this BEFORE drilling into a pipe because if you are googling "how to fix a copper pipe" and your water main is still on, then you are going to need professional help).
2) Clean up the mess and put a towel under the pipe where the hole is.
3) Drain your system by turning on your hot and cold water faucets in the bathrooms especially in the lowest level of your house.
4) Get a pipe cutter, deburr/depth gauge tool, and shark bite push-fit coupling from your local hardware store.
5) Cut the pipe on either side of the hole no more than 2 inches long. Be patient with cutting the pipe. It may take a while.
6) This short video shows you the rest of the steps. And dude had an accent so that's extra reason to watch.

I hope this saves someone $200+ in their next plumbing emergency!

Saturday, March 21, 2015

Dumb Dumb Dumb (aka Uncharacteristic Carelessness)

Biggest home repair fail yet...

Context first - I have been meaning to repair this poor drywall installation/missing drywall in my spare room for a while. I decided to take a stab at it this weekend while the room was vacated. The primary motivation is to make sure there is drywall along the bottom of the wall so I can install baseboards. [I've already installed baseboards in my room, but will have to blog about that later.]

A section of drywall had been replaced by a previous owner, but it was cracking between the pieces because he/she didn't use drywall tape (see picture above). I cut out the piece of drywall between the poorly-installed one and the access panel to the bathtub plumbing so I could replace the whole section with one piece.
The continuous piece includes a section below the tub pipes so I can install a single piece of baseboard along that wall. I'm planning to replace the plywood access panel with a drywall access
 
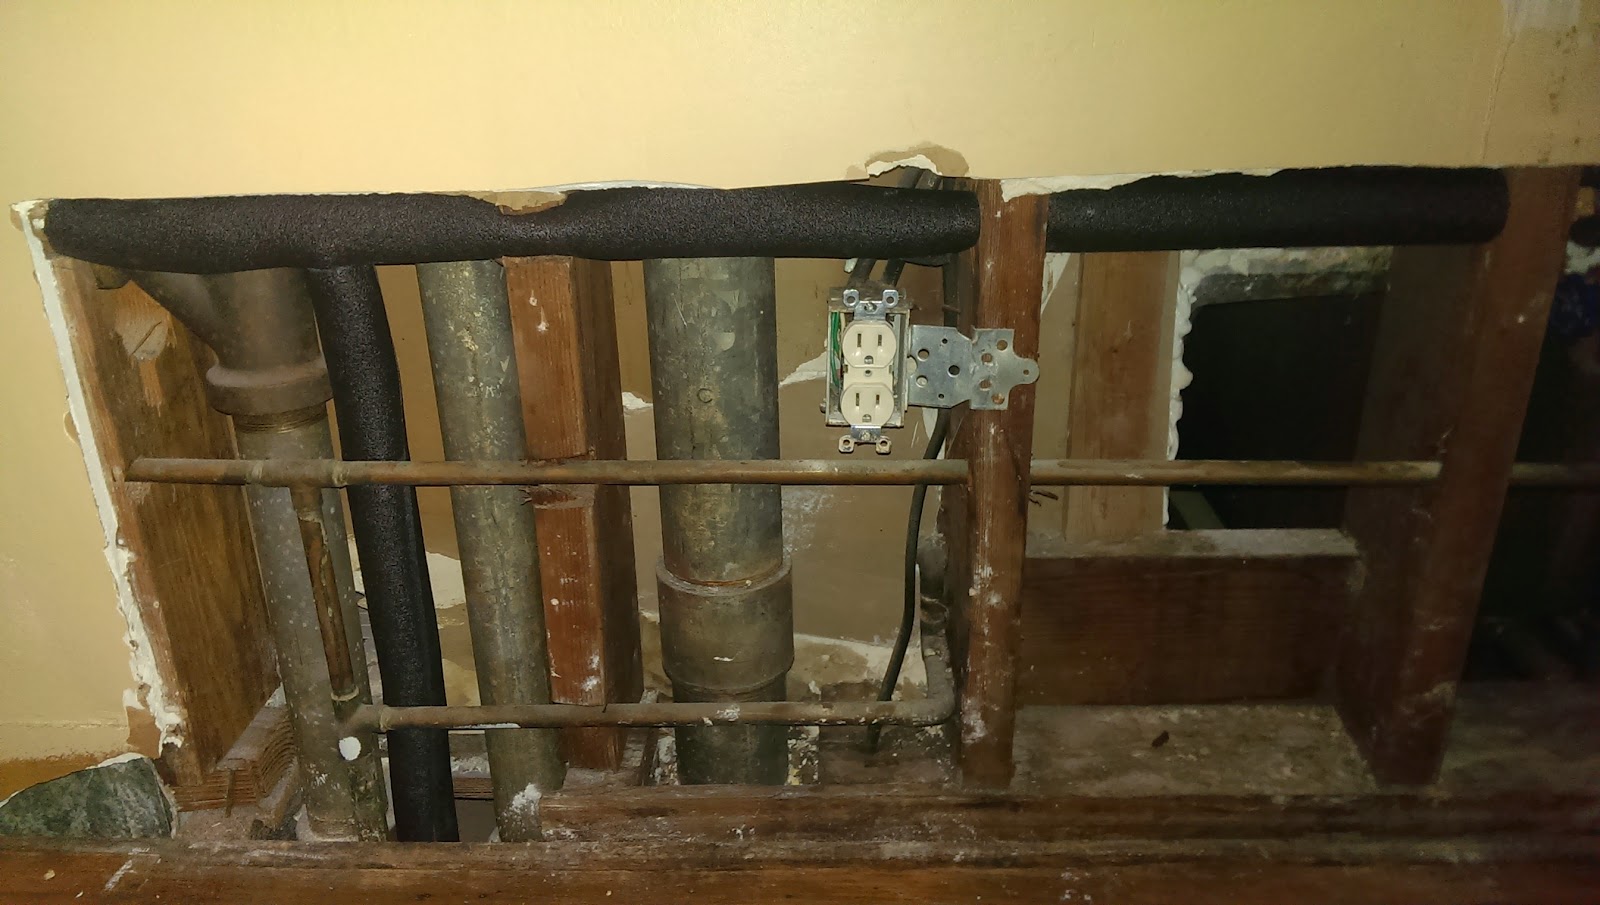
While I had the wall open, I decided to insulate my hot water pipes some foam pipe insulation. There's a lot going on in the wall, so I had to cut some of the insulation to fit around the drain pipes. The insulation seemed snug enough and there appeared to be enough space for the drywall.

Black foam insulation along one vertical pipe and top horizontal hot water pipe


After measuring for the new drywall piece, I got to cutting. Luckily, one of my coworkers had some extra drywall that he gifted to me (Thanks, Doug!), so I had a full piece of drywall to work with. All of the scraps I had around were shorter than the 54ish inches that I needed.


I also needed to cut out a hole for the electrical socket, so my utility knife got a lot of use. So far so good. I started to screw it in and it fit! I was a little nervous about that because of the added pipe insulation. Just a few more screws and then I'd be ready for the hard part... drywall tape and mudding. And then I did something really really stupid.

I drilled right into a pipe... yep, I could hear water spewing. However, at first it sounded like air, so removed the screw and water went everywhere. You should have seen how fast I darted down 2 flights of stairs to my water main to turn it off!

uhoh
The worst part is I even had a gut instinct right before that screw that told me "check the pictures you took of inside of the wall"... but did I? No. I didn't. Like I said... really really stupid.

I called Roto-Rooter for some emergency plumbing and Lee came to fix it for me for $250. He also showed me how to fix a section of pipe while he was doing it and we were chatting. [Guess who needs a pipe cutter and solder! :)] He was really entertaining. I learned all about his family and a ton about his past history. He made the experience so much better. He could have said, "you should have called someone else to do this type of work," but instead he was very encouraging about all of the work I put into the house. He said homeowners need to know a lot more about their homes so they don't get "taken" (and proceeded to tell me a long story about a horrible contractor and a nice elderly woman). He applauded my independence. His parting words were "Miss Laura, keep on drilling" to which I replied "...in the right places."

Sometimes DIY isn't easier on the wallet, but it's humbling and character-building, right? Maybe I'll even learn to listen to my gut instincts... and that would be priceless.